Sunday, May 8, 2016

[Windows Deployment: via Linux Server]: Setting Up Prerequisites to ‘Install Windows 7’ over ‘PXE Network Boot Server’ on RHEL/CentOS 7

Setting up a ‘PXE Network Boot Server’ for Multiple Linux Distribution Installations in RHEL/CentOS 7


PXE Server – Preboot eXecution Environment – instructs a client computer to boot, run or install an operating system directly form a network interface, eliminating the need to burn a CD/DVD or use a physical medium, or, can ease the job of installing Linux distributions on your network infrastructure on multiple machines the same time.
Setting PXE Network Boot in CentOS
Setting PXE Network Boot in RHEL/CentOS 7

Requirements

  1. CentOS 7 Minimal Installation Procedure
  2. RHEL 7 Minimal Installation Procedure
  3. Configure Static IP Address in RHEL/CentOS 7
  4. Remove Unwanted Services in RHEL/CentOS 7
  5. Install NTP Server to Set Correct System Time in RHEL/CentOS 7
This article will explain how you can install and configure a PXE Server on RHEL/CentOS 7 x64-bit with mirrored local installation repositories, sources provided by CentOS 7 DVD ISO image, with the help of DNSMASQ Server.
Which provides DNS and DHCP services, Syslinux package which provides bootloaders for network booting, TFTP-Server, which makes bootable images available to be downloaded via network using Trivial File Transfer Protocol (TFTP) and VSFTPD Server which will host the local mounted mirrored DVD image – which will act as an official RHEL/CentOS 7 mirror installation repository from where the installer will extract its required packages.

Step 1: Install and configure DNSMASQ Server

1. No need to remind you that is absolutely demanding that one of your network card interface, in case your server poses more NICs, must be configured with a static IP address from the same IP range that belongs to the network segment that will provide PXE services.
So, after you have configured your static IP Address, updated your system and performed other initial settings, use the following command to install DNSMASQ daemon.
# yum install dnsmasq
Install dnsmasq in CentOS
Install dnsmasq Package
2. DNSMASQ main default configuration file located in /etc directory is self-explanatory but intends to be quite difficult to edit, do to its highly commented explanations.
First make sure you backup this file in case you need to review it later and, then, create a new blank configuration file using your favorite text editor by issuing the following commands.
# mv /etc/dnsmasq.conf  /etc/dnsmasq.conf.backup
# nano /etc/dnsmasq.conf
3. Now, copy and paste the following configurations on dnsmasq.conf file and assure that you change the below explained statements to match your network settings accordingly.
interface=eno16777736,lo
#bind-interfaces
domain=centos7.lan
# DHCP range-leases
dhcp-range= eno16777736,192.168.1.3,192.168.1.253,255.255.255.0,1h
# PXE
dhcp-boot=pxelinux.0,pxeserver,192.168.1.20
# Gateway
dhcp-option=3,192.168.1.1
# DNS
dhcp-option=6,92.168.1.1, 8.8.8.8
server=8.8.4.4
# Broadcast Address
dhcp-option=28,10.0.0.255
# NTP Server
dhcp-option=42,0.0.0.0

pxe-prompt="Press F8 for menu.", 60
pxe-service=x86PC, "Install CentOS 7 from network server 192.168.1.20", pxelinux
enable-tftp
tftp-root=/var/lib/tftpboot
Dnsmasq Configuration in CentOS
Dnsmasq Configuration
The statements that you need to change are follows:
  1. interface – Interfaces that the server should listen and provide services.
  2. bind-interfaces – Uncomment to bind only on this interface.
  3. domain – Replace it with your domain name.
  4. dhcp-range – Replace it with IP range defined by your network mask on this segment.
  5. dhcp-boot – Replace the IP statement with your interface IP Address.
  6. dhcp-option=3,192.168.1.1 – Replace the IP Address with your network segment Gateway.
  7. dhcp-option=6,92.168.1.1 – Replace the IP Address with your DNS Server IP – several DNS IPs can be defined.
  8. server=8.8.4.4 – Put your DNS forwarders IPs Addresses.
  9. dhcp-option=28,10.0.0.255 – Replace the IP Address with network broadcast address –optionally.
  10. dhcp-option=42,0.0.0.0 – Put your network time servers – optionally (0.0.0.0 Address is for self-reference).
  11. pxe-prompt – Leave it as default – means to hit F8 key for entering menu 60 with seconds wait time..
  12. pxe=service – Use x86PC for 32-bit/64-bit architectures and enter a menu description prompt under string quotes. Other values types can be: PC98, IA64_EFI, Alpha, Arc_x86, Intel_Lean_Client, IA32_EFI, BC_EFI, Xscale_EFI and X86-64_EFI.
  13. enable-tftp – Enables the build-in TFTP server.
  14. tftp-root – Use /var/lib/tftpboot – the location for all netbooting files.
For other advanced options concerning configuration file feel free to read dnsmasq manual.

Step 2: Install SYSLINUX Bootloaders

4. After you have edited and saved DNSMASQ main configuration file, go ahead and install Syslinx PXE bootloader package by issuing the following command.
# yum install syslinux
Install Syslinux Bootloaders in CentOS
Install Syslinux Bootloaders
5. The PXE bootloaders files reside in /usr/share/syslinux absolute system path, so you can check it by listing this path content. This step is optional, but you might need to be aware of this path because on the next step, we will copy of all its content to TFTP Server path.
# ls /usr/share/syslinux
Syslinux Files
Syslinux Files

Step 3: Install TFTP-Server and Populate it with SYSLINUX Bootloaders

6. Now, let’s move to next step and install TFTP-Server and, then, copy all bootloders files provided by Syslinux package from the above listed location to /var/lib/tftpboot path by issuing the following commands.
# yum install tftp-server
# cp -r /usr/share/syslinux/* /var/lib/tftpboot
Install TFTP Server In CentOS
Install TFTP Server

Step 4: Setup PXE Server Configuration File

7. Typically the PXE Server reads its configuration from a group of specific files (GUID files – first, MAC files – next, Default file – last) hosted in a folder called pxelinux.cfg, which must be located in the directory specified in tftp-root statement from DNSMASQ main configuration file.
Create the required directory pxelinux.cfg and populate it with a default file by issuing the following commands.
# mkdir /var/lib/tftpboot/pxelinux.cfg
# touch /var/lib/tftpboot/pxelinux.cfg/default
8. Now it’s time to edit PXE Server configuration file with valid Linux distributions installation options. Also note that all paths used in this file must be relative to the /var/lib/tftpboot directory.
Below you can see an example configuration file that you can use it, but modify the installation images (kernel and initrd files), protocols (FTP, HTTP, HTTPS, NFS) and IPs to reflect your network installation source repositories and paths accordingly.
# nano /var/lib/tftpboot/pxelinux.cfg/default
Add the following whole excerpt to the file.
default menu.c32
prompt 0
timeout 300
ONTIMEOUT local

menu title ########## PXE Boot Menu ##########

label 1
menu label ^1) Install CentOS 7 x64 with Local Repo
kernel centos7/vmlinuz
append initrd=centos7/initrd.img method=ftp://192.168.1.20/pub devfs=nomount

label 2
menu label ^2) Install CentOS 7 x64 with http://mirror.centos.org Repo
kernel centos7/vmlinuz
append initrd=centos7/initrd.img method=http://mirror.centos.org/centos/7/os/x86_64/ devfs=nomount ip=dhcp

label 3
menu label ^3) Install CentOS 7 x64 with Local Repo using VNC
kernel centos7/vmlinuz
append  initrd=centos7/initrd.img method=ftp://192.168.1.20/pub devfs=nomount inst.vnc inst.vncpassword=password

label 4
menu label ^4) Boot from local drive
Configure PXE Server
As you can see CentOS 7 boot images (kernel and initrd) reside in a directory named centos7 relative to /var/lib/tftpboot (on an absolute system path this would mean /var/lib/tftpboot/centos7) and the installer repositories can be reached by using FTP protocol on 192.168.1.20/pub network location – in this case the repos are hosted locally because the IP address is the same as the PXE server address).
Also menu label 3 specifies that the client installation should be done from a remote location via VNC (here replace VNC password with a strong password) in case you install on a headless client and the menu label 2 specifies as
installation sources a CentOS 7 official Internet mirror (this case requires an Internet connection available on client through DHCP and NAT).
Important: As you see in the above configuration, we’ve used CentOS 7 for demonstration purpose, but you can also define RHEL 7 images, and following whole instructions and configurations are based on CentOS 7 only, so be careful while choosing distribution.

Step 5: Add CentOS 7 Boot Images to PXE Server

9. For this step CentOS kernel and initrd files are required. To get those files you need the CentOS 7 DVD ISO Image. So, go ahead and download CentOS DVD Image, put it in your DVD drive and mount the image to /mnt system path by issuing the below command.
The reason for using the DVD and not a Minimal CD Image is the fact that later this DVD content would be used to create the
locally installer repositories for FTP sources.
# mount -o loop /dev/cdrom  /mnt
# ls /mnt
Mount CentOS DVD
Mount CentOS DVD
If your machine has no DVD drive you can also download CentOS 7 DVD ISO locally using wget or curl utilities from a CentOS mirror and mount it.
# wget http://mirrors.xservers.ro/centos/7.0.1406/isos/x86_64/CentOS-7.0-1406-x86_64-DVD.iso
# mount -o loop /path/to/centos-dvd.iso  /mnt
10. After the DVD content is made available, create the centos7 directory and copy CentOS 7 bootable kernel and initrd images from the DVD mounted location to centos7 folder structure.
# mkdir /var/lib/tftpboot/centos7
# cp /mnt/images/pxeboot/vmlinuz  /var/lib/tftpboot/centos7
# cp /mnt/images/pxeboot/initrd.img  /var/lib/tftpboot/centos7
Copy CentOS Bootable Files
The reason for using this approach is that, later you can create new separate directories in /var/lib/tftpboot path and add other Linux distributions to PXE menu without messing up the entire directory structure.

Step 6: Create CentOS 7 Local Mirror Installation Source

11. Although you can setup Installation Source Mirrors via a variety of protocols such as HTTP, HTTPS or NFS, for this guide, I have chosen FTP protocol because is very reliable and easy to setup with the help of vsftpd server.
Further install vsftpd daemon, copy all DVD mounted content to vsftpd default server path (/var/ftp/pub) – this can take a while depending on your system resources and append readable permissions to this path by issuing the following commands.
# yum install vsftpd
# cp -r /mnt/*  /var/ftp/pub/ 
# chmod -R 755 /var/ftp/pub
Install Vsftpd in CentOS
Install Vsftpd Server
Copy Files to FTP Path
Set Permissions on FTP Path

Step 7: Start and Enable Daemons System-Wide

12. Now that the PXE server configuration is finally finished, start DNSMASQ and VSFTPD servers, verify their status and enable it system-wide, to automatically start after every system reboot, by running the below commands.
# systemctl start dnsmasq
# systemctl status dnsmasq
# systemctl start vsftpd
# systemctl status vsftpd
# systemctl enable dnsmasq
# systemctl enable vsftpd
Start Dnsmasq Service
Start Vsftpd Service

Step 8: Open Firewall and Test FTP Installation Source

13. To get a list of all ports that needs to be open on your Firewall in order for client machines to reach and boot from PXE server, run netstat command and add CentOS 7 Firewalld rules accordingly to dnsmasq and vsftpd listening ports.
# netstat -tulpn
# firewall-cmd --add-service=ftp --permanent   ## Port 21
# firewall-cmd --add-service=dns --permanent   ## Port 53
# firewall-cmd --add-service=dhcp --permanent   ## Port 67
# firewall-cmd --add-port=69/udp --permanent   ## Port for TFTP
# firewall-cmd --add-port=4011/udp --permanent  ## Port for ProxyDHCP
# firewall-cmd --reload  ## Apply rules
Check Listening Ports
Open Ports in Firewall in CentOS
Open Ports in Firewall
14. To test FTP Installation Source network path open a browser locally (lynx should do it) or on a different computer and type the IP Address of your PXE server with
FTP protocol followed by /pub network location on URL filed and the result should be as presented in the below screenshot.
ftp://192.168.1.20/pub
Access FTP Files via Browser
15. To debug PXE server for eventual misconfigurations or other information and diagnostics in live mode run the following command.
# tailf /var/log/messages
Check PXE Logs for Errors
16. Finally, the last required step that you need to do is to unmount CentOS 7 DVD and remove the physical medium.
# umount /mnt

Step 9: Configure Clients to Boot from Network

17. Now your clients can boot and install CentOS 7 on their machines by configuring Network Boot as primary boot device from their systems BIOS or by hitting a specified key during BIOS POST operations as specified in motherboard manual.
In order to choose network booting. After first PXE prompt appears, press F8 key to enter presentation and then hit Enter key to proceed forward to PXE menu.
PXE Network Boot
PXE Network Boot
PXE Network OS Boot
PXE Network OS Boot
18. Once you have reached PXE menu, choose your CentOS 7 installation type, hit Enter key and continue with the installation procedure the same way as you might install it from a local media boot device.
Please note down that using variant 2 from this menu requires an active Internet connection on the target client. Also, on below
screenshots you can see an example of a client remote installation via VNC.
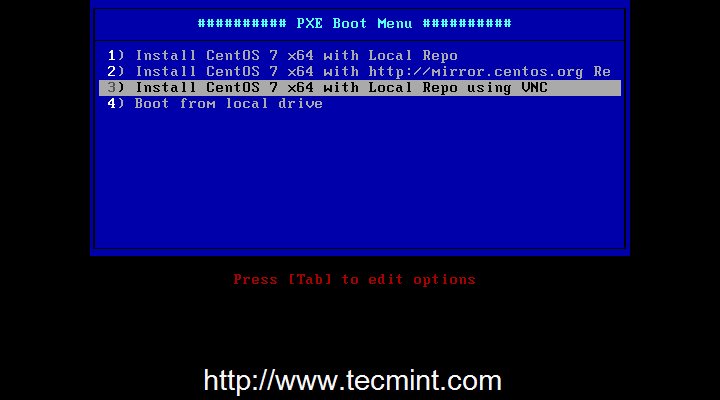
PXE Menu
PXE Menu
Remote Linux Installation via VNC
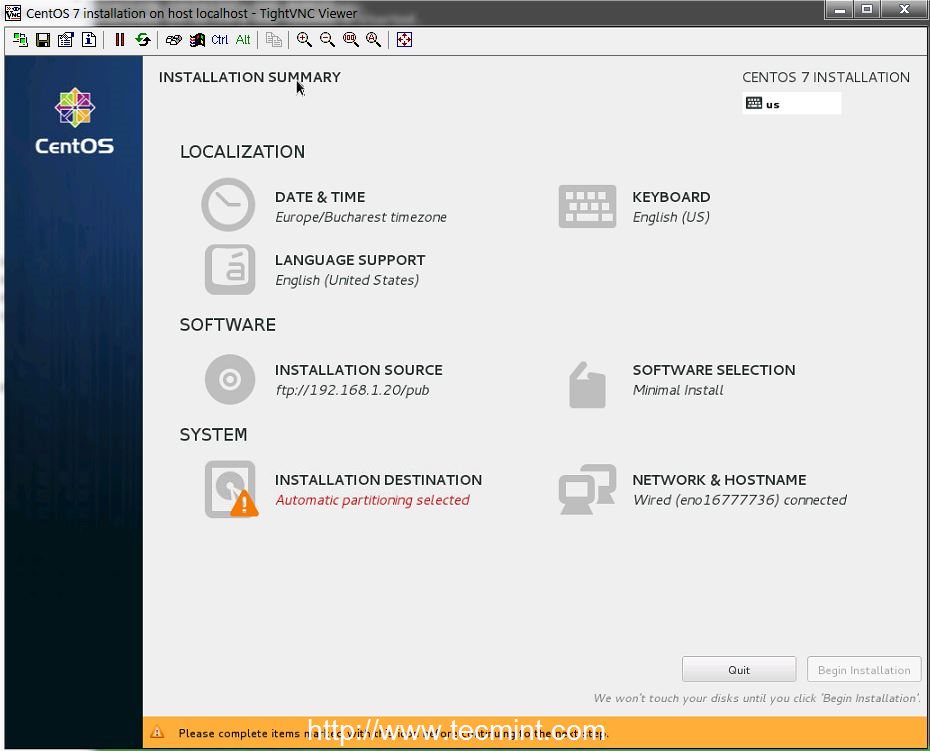
Remote Installation of CentOS
That’s all for setting up a minimal PXE Server on CentOS 7. On my next article from this series, I will discuss other issues concerning this PXE server configuration such as how to setup automated installations of CentOS 7 using Kickstart files and adding other Linux distributions to PXE menu – Ubuntu Server and Debian 7.


Requirements

  1. CentOS 7.0 DVD ISO

CentOS 7.0 Installation Process

1. After downloading the last version of CentOS using above links or using official CentOS download page. Burn it to a DVD or create a bootable USB stick using LiveUSB Creator called Unetbootin.
2. After you have created the installer bootable media, place your DVD/USB into your system appropriate drive, start the computer, select your bootable unit and the first CentOS 7 prompt should appear. At the prompt choose Install CentOS 7 and press [Enter] key.
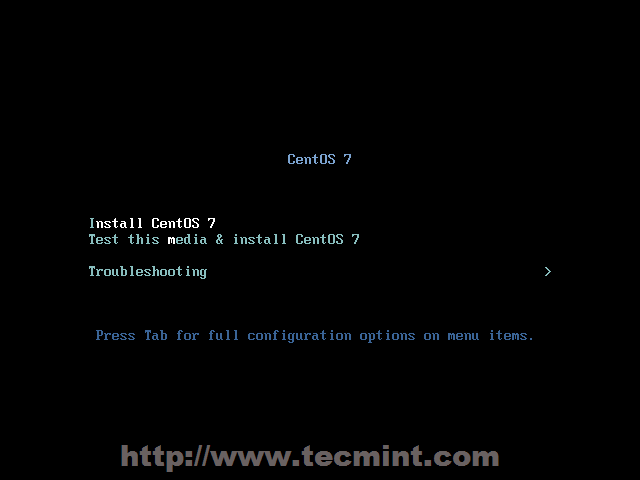
Install CentOS 7
CentOS 7 Boot Menu
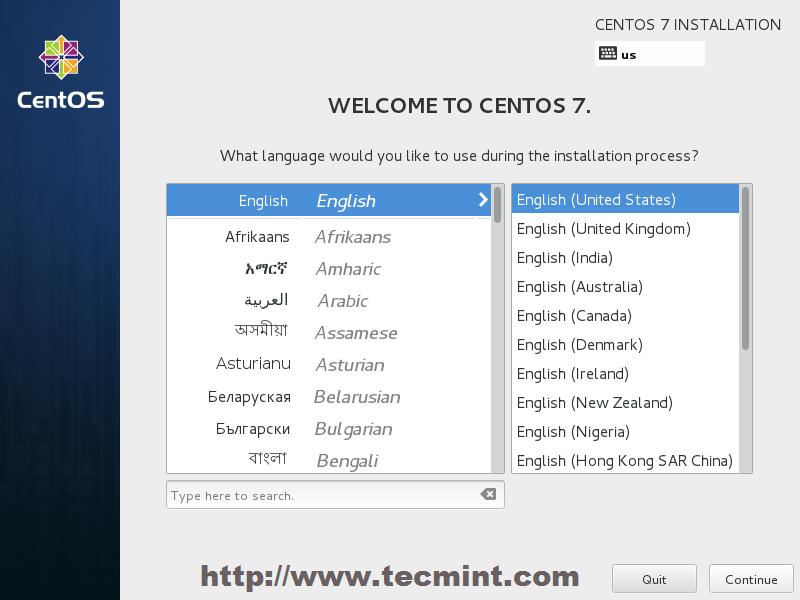
3. The system will start loading media installer and a Welcome screen should appear. Select your Installation Process Language, that will assist you through the entire installation procedure and click on Continue.
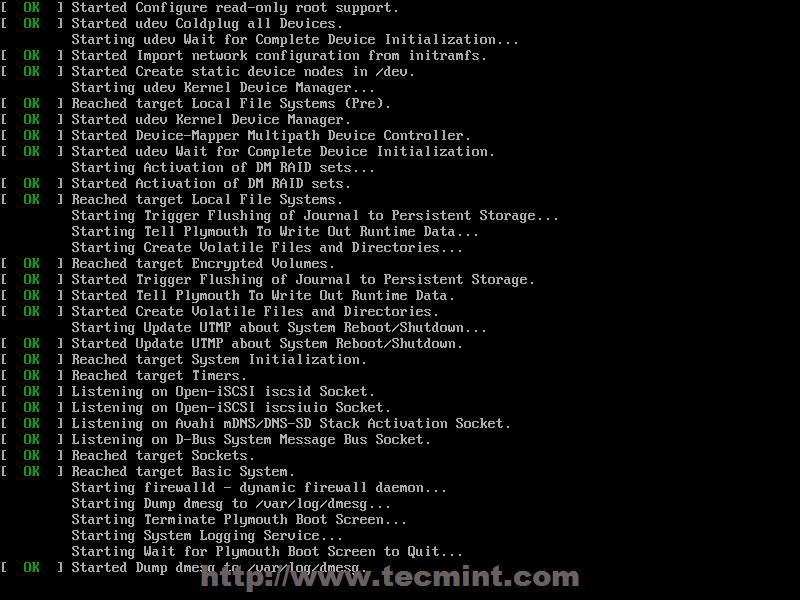
CentOS 7 Booting
CentOS Installer Loading
Select Installation Process Language
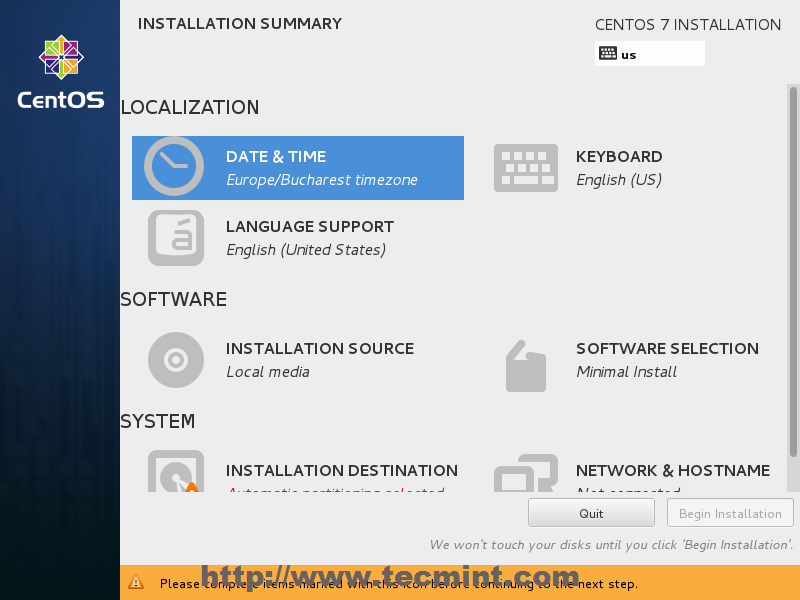
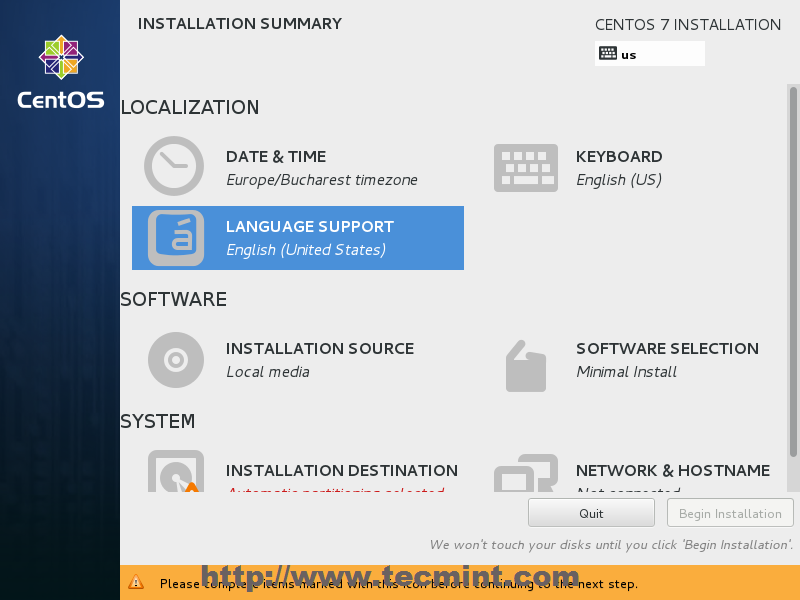
4. The next step, present screen prompt is Installation Summary. It contains a lot of options to fully customize your system. First thing you may want to setup is your time settings. Click on Date & Time and select your server physical location from the provided map and hit on upper Done button to apply configuration.
Select Date & Time and Location
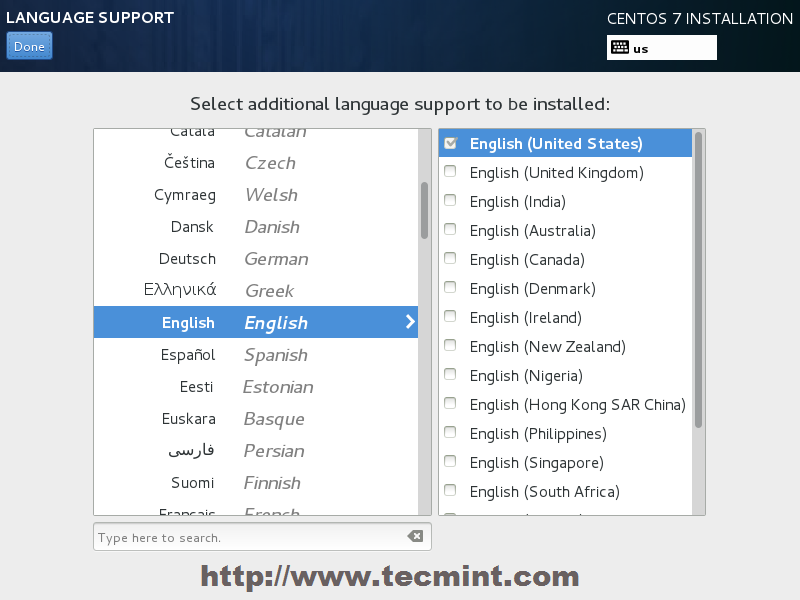
5. The next step is to choose your Language Support and Keyboard settings. Choose your main and extra language for your system and when you’re finished hit on Done button.
Select Language and Keyboard
Select English Language
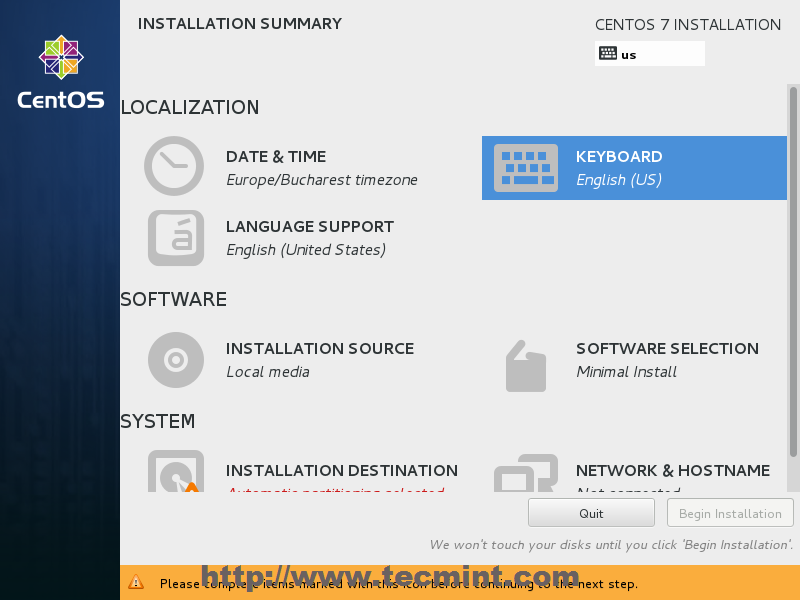
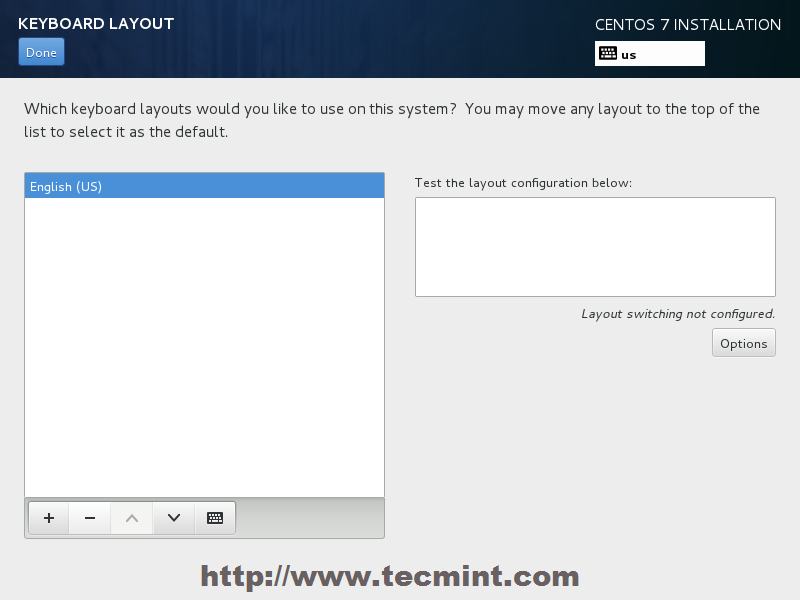
6. The same way choose your Keyboard Layout by hitting the plus button and test your keyboard configuration using the right input filed. After you finish setting up your keyboard, again hit on upper Done button to apply changes and go back to main screen on Installation Summary.
Choose Keyboard Layout
Choose English Keyboard
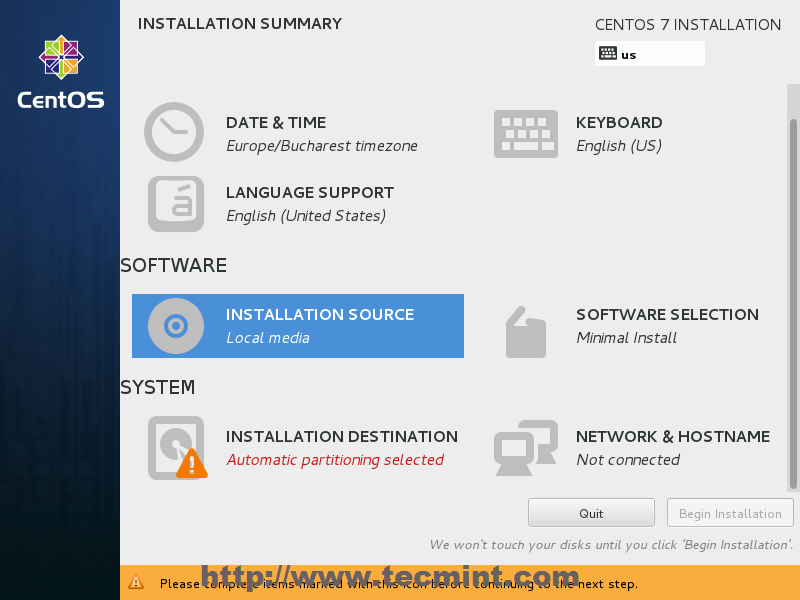
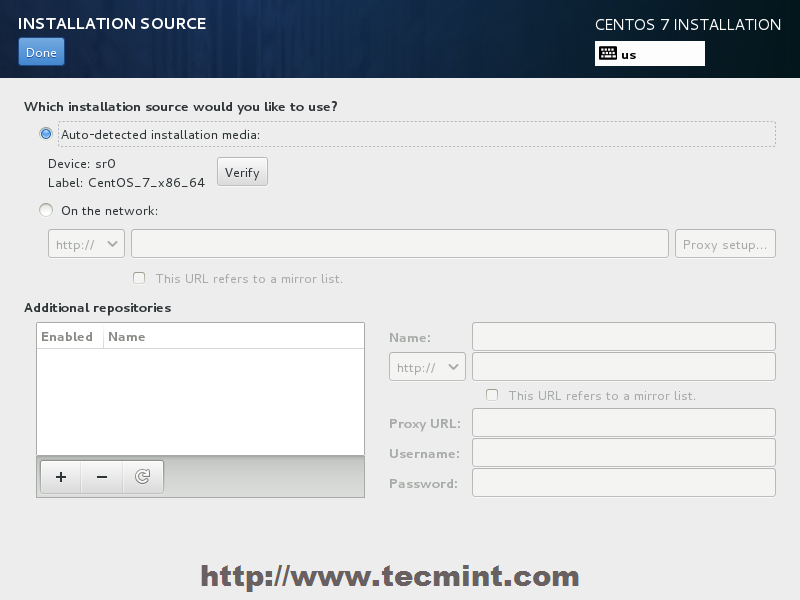
7. On the next step you can customize your installation by using other Installation Sources than your local DVD/USB media, such as a network locations using HTTP, HTTPS, FTP or NFS protocols and even add some additional repositories, but use this methods only if you know what you’re doing. So leave the default Auto-detected installation media and hit on Done to continue.
Choose Installation Sources
Auto Detect Installation Type
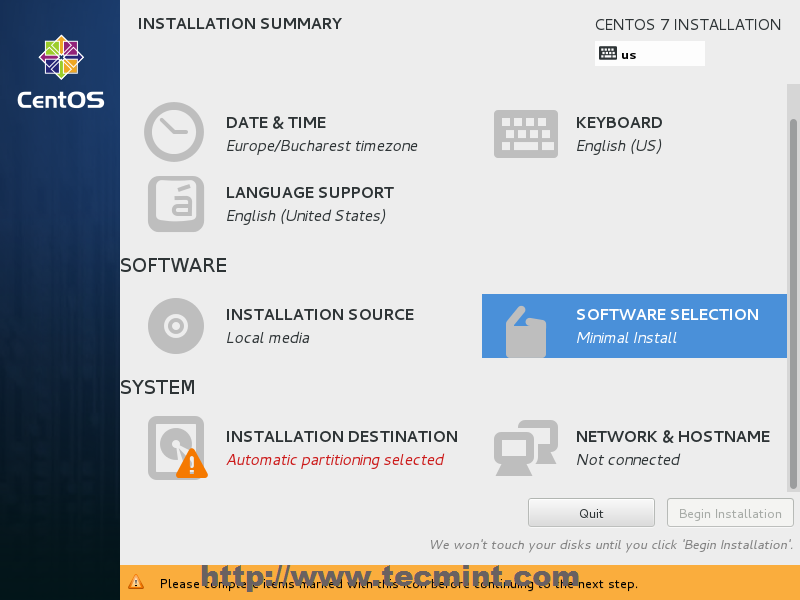
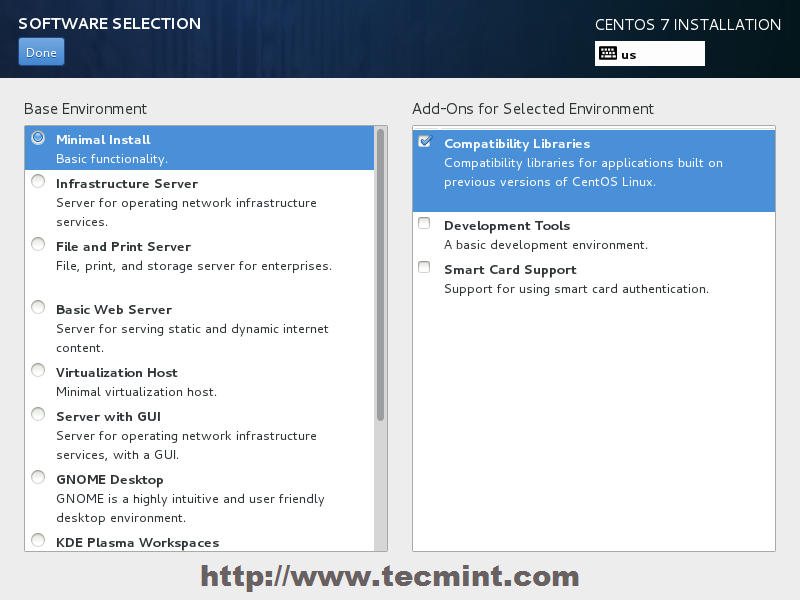
8. On the next step you can choose your system installation software. On this step CentOS offers a lot of Server and Desktop platform environments that you choose from, but, if you want a high degree of customization, especially if you are going to use CentOS 7 to run as a server platform, then I suggest you select Minimal Install with Compatibility Libraries as Add-ons, which will install a minimal basic system software and later you can add other packages as your needs require using yum groupinstall command.
Software Selection
Software Selection
Select CentOS 7 Minimal Install
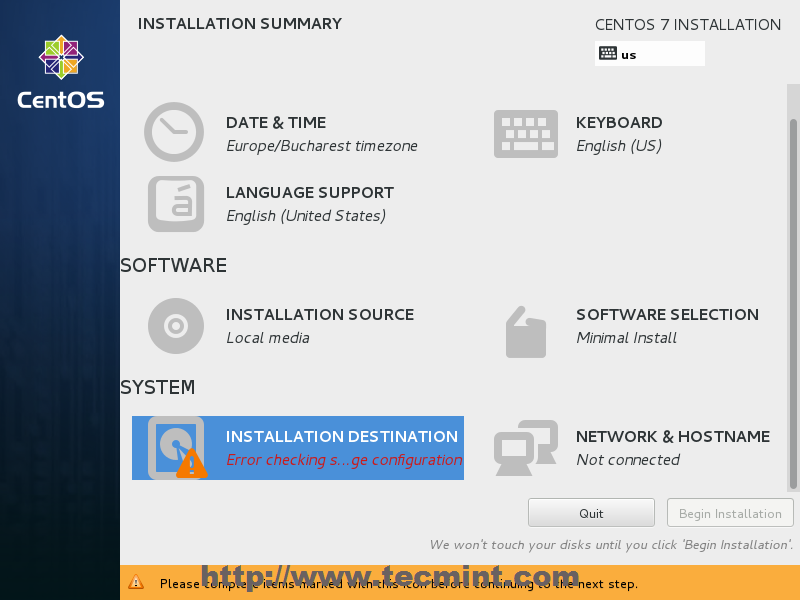
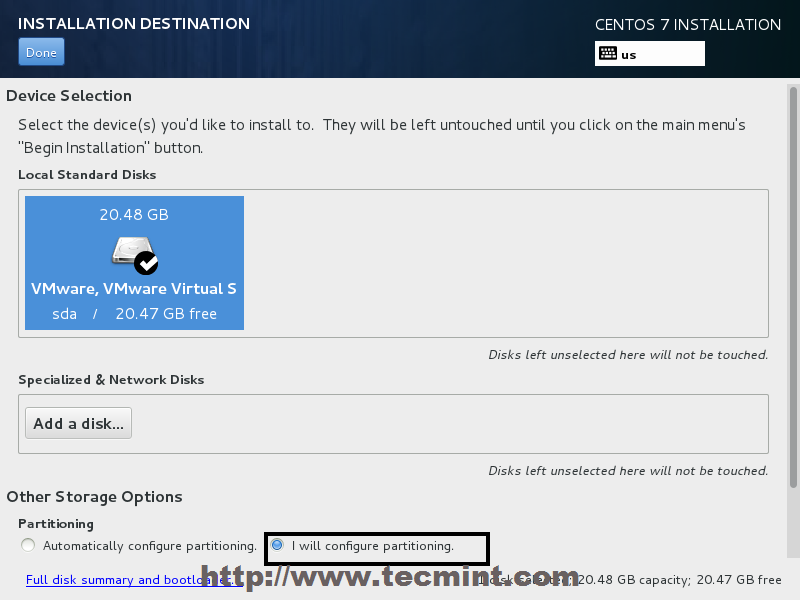
9. Now it’s time to partition your hard-drive. Click on Installation Destination menu, select your disk and choose I will configure partitioning.
Choose Installation Destination
Installation Device Selection
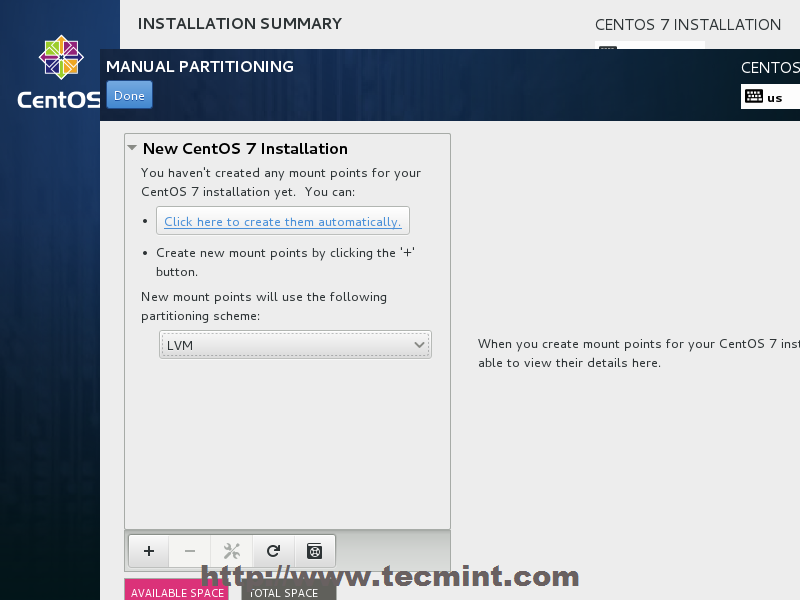
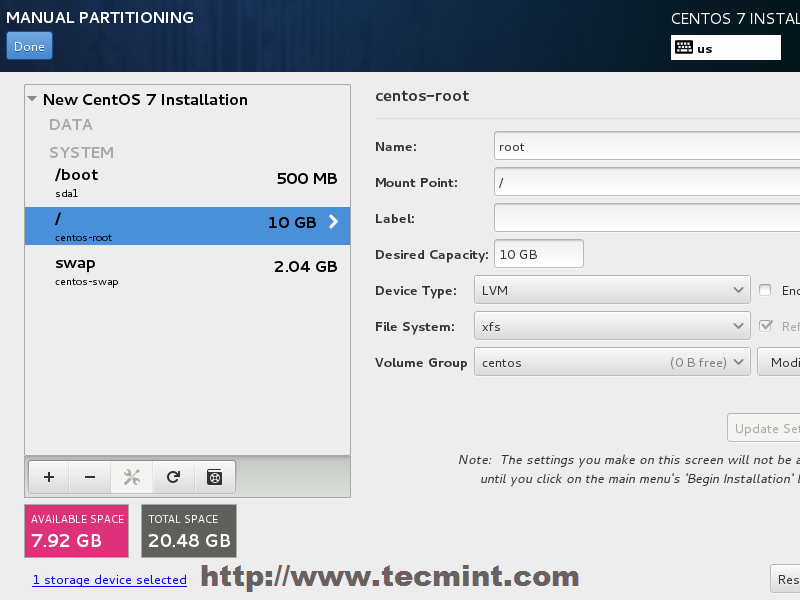
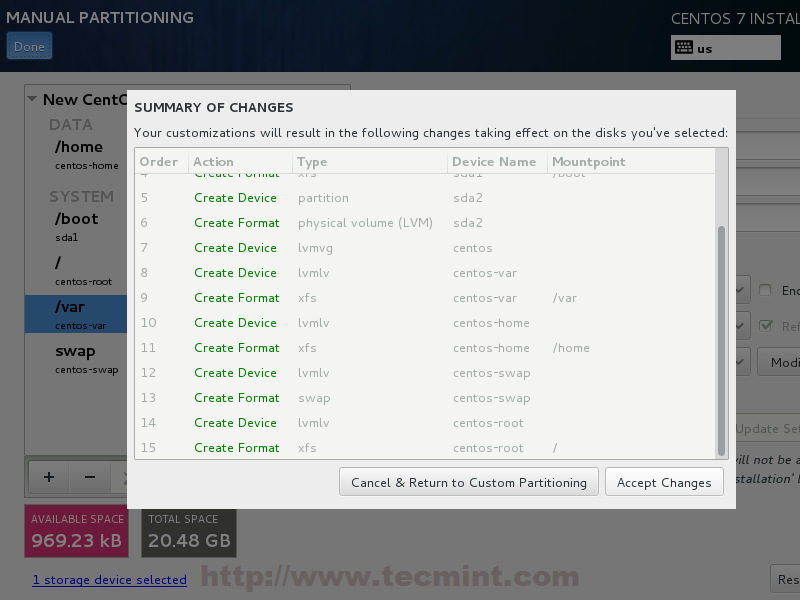
10. On the next screen, choose LVM (Logical Volume Manager) as partition layout and, then, click on Click here to create them automatically, option which will create three system partition using XFS filesystem, automatically redistributing your hard-disk space and gathering all LVS into one big Volume Group named centos.
  1. /boot – Non LVM
  2. /(root) – LVM
  3. Swap – LVM
Select LVM Partition Type
Create Partitions
Create Partitions
11. If you are not pleased with the default partition layout done automatically by the installer you can completely add, modify or resize your partition scheme and when you finish hit on Done button and Accept Changes on the Summary of Changes prompt.
Summary of Partition Changes
NOTE: For those users, who have hard-disks more than 2TB in size, the installer automatically will convert partition table to GPT, but if you wish to use GPT table on smaller disks than 2TB, then you should use the argument inst.gpt to the installer boot command line in order to change the default behaviour.
12. The next step is to set your system hostname and enable networking. Click on Network & Hostname label and type your system FQDN (Fully Qualified Domain Name) on Hostname filed, then enable your Network interface, switching the top Ethernet button to ON.
If you have a functional DHCP server on you network then it will automatically configure all your network setting for enabled NIC, which should appear under your active interface.
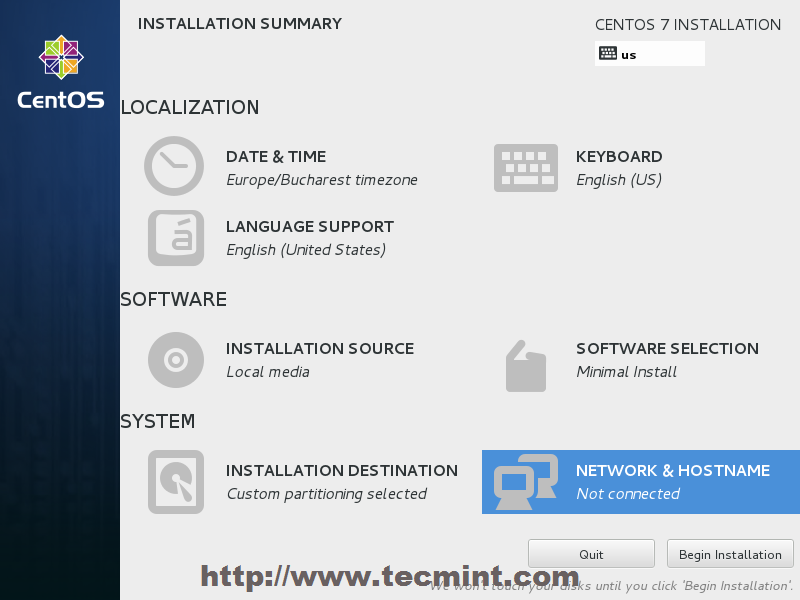
Set System Hostname
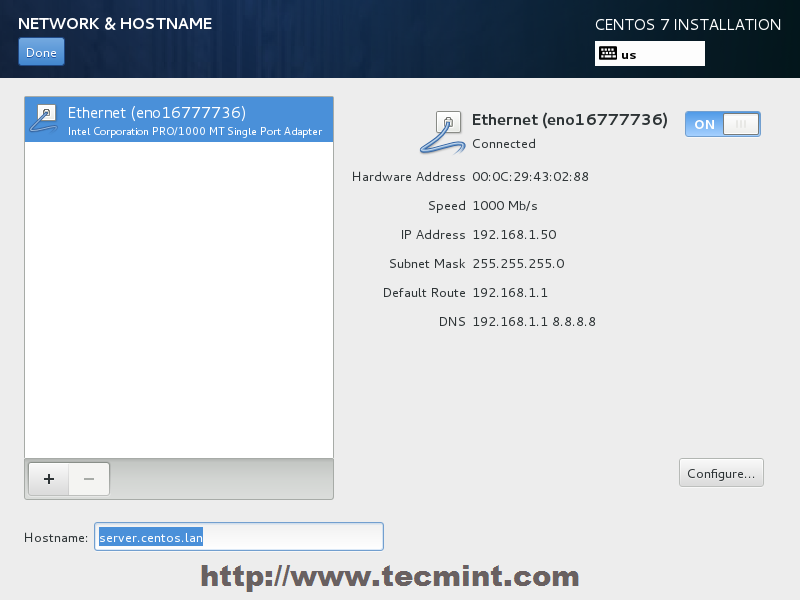
Set System Hostname
Enable Ethernet Interface
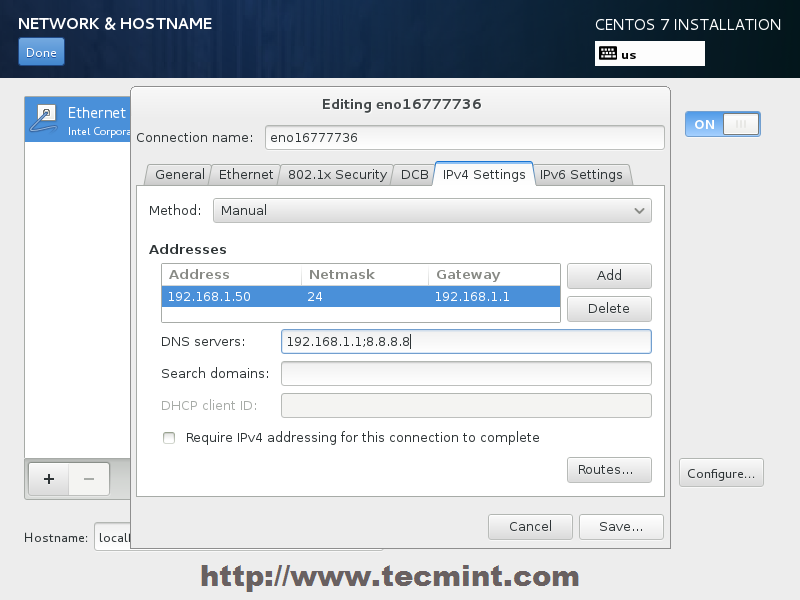
13. If your system will be destined as a server it’s better to set static network configuration on Ethernet NIC by clicking on Configure button and add all your static interface settings like in the screenshot below, and when you’re finished hit on Save button, disable and enable Ethernet card by switching the button to OFF and ON, and, then hit on Done to apply setting and go back to main menu.
Enter Network Settings
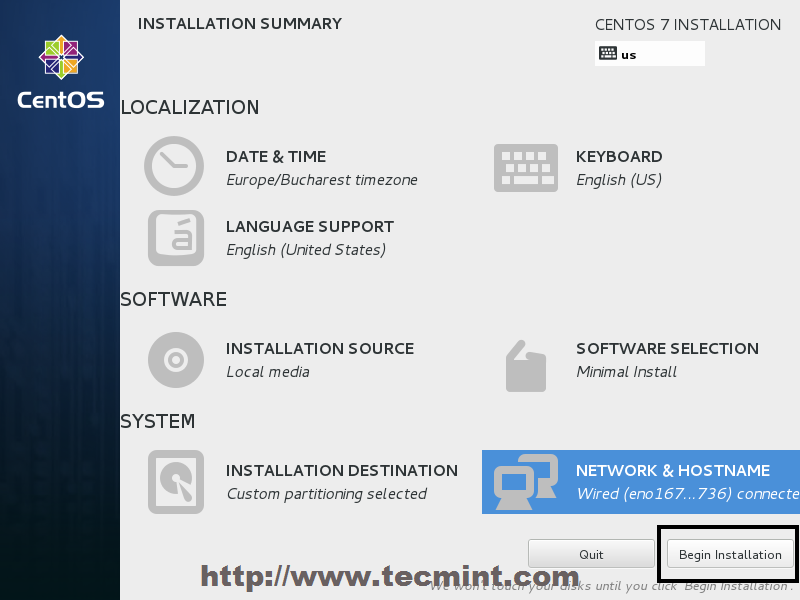
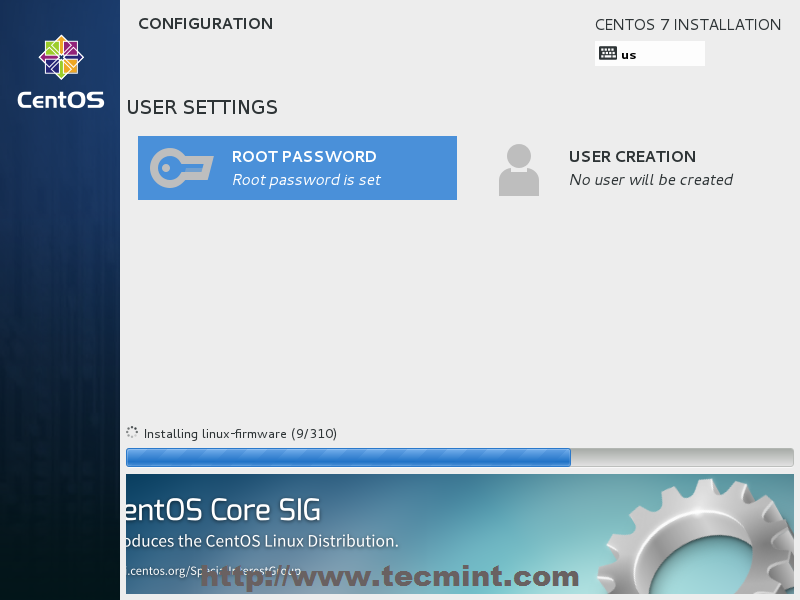
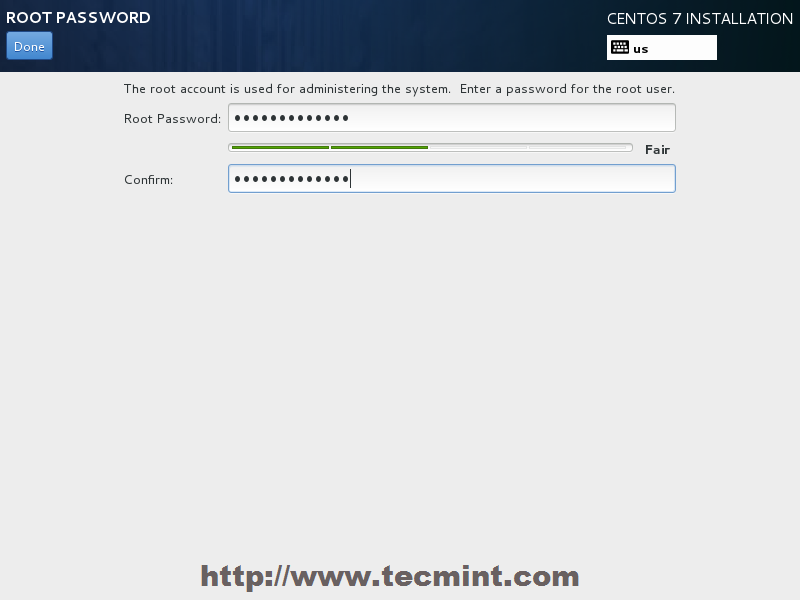
14. Now it’s time to start installation process by pressing on Begin Installation button and set up a strong password for root account.
Click on Begin Installation
CentOS 7 Root Password
Select Root Password
Set Root Password in CentOS 7
Enter Root Password
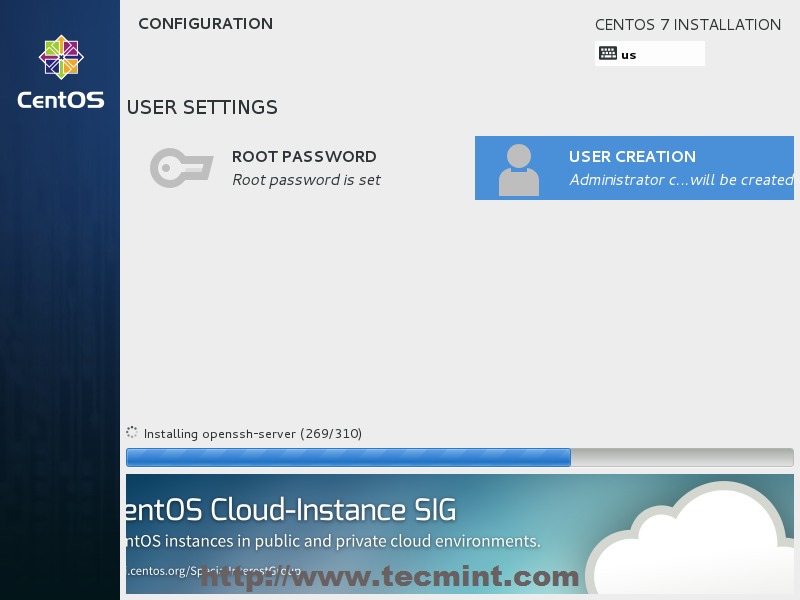
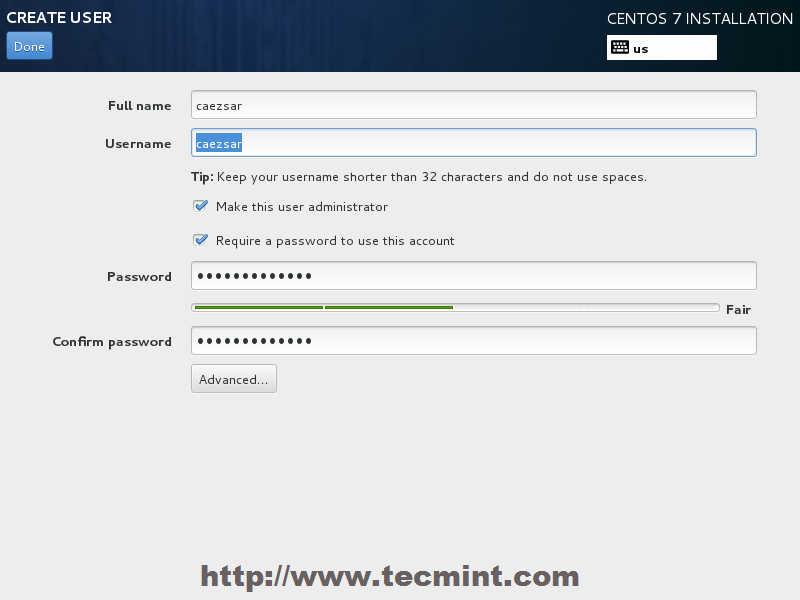
15. After you finish setting up a strong password for root account move to User Creation and create your first system user. You can designate this user to become a System Admin with root privileges using sudo command by checking the box Make this user administrator, then click on Done to go back on main menu and wait for the installation process to finish.
CentOS 7 Installation Process
User Creation and Set Password
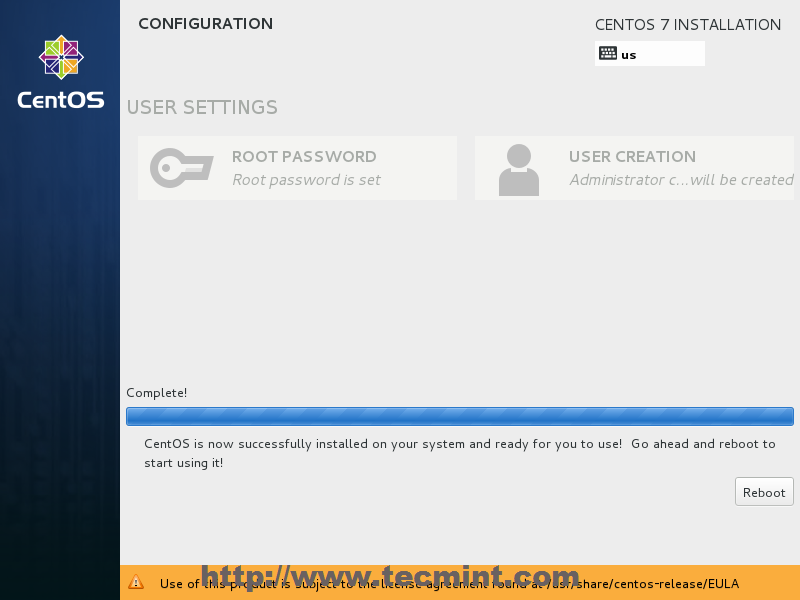
16. After the installation process finishes, the installer will show a successfully message on screen, demanding to reboot your system in order to use it.
CentOS 7 Installation Complete
Congratulation! You have now installed last version of CentOS on your bare new machine. Remove any installation media and reboot your computer so you can login to your new minimal CentOS 7 environment and perform other system tasks, such as update you system and install other useful software needed to run day to day tasks.

Disable and Remove Unwanted Services on RHEL/CentOS 7 Minimal Installation


RHEL/CentOS 7 minimal installation for servers comes with some default pre-installed services, such as Postfix Mail Transfer Agent daemon, Avahi mdns daemon (multicast Domain Name System) and Chrony service, which is responsible to maintain system clock.
Disable Services in CentOS 7
Remove Services in CentOS 7
Now comes to the question.. Why wed need to disable all these services. if they are pre-installed? One of the main reason would be to increase system security level degree, the second reason is system final destination and the third is system resources.

Requirements

  1. CentOS 7 Minimal Installation
  2. RHEL 7 Minimal Installation
If you are planning to use your newly installed RHEL/CentOS 7 to host, let’s say, a small website which runs on Apache or Nginx, or to provide network services like DNS, DHCP, PXE boot, FTP server, etc or other services that don’t require to run Postifx MTA daemon, Chrony or Avahi daemon, then why we should keep all these unnecessary daemons installed or even running on your server.
The main external services that your server truly requires to run after you perform a minimal installation would be just a SSH daemon, in order to allow remote logins on system, and, in some cases, NTP service, to accurately synchronize your server internal clock with external NTP servers.

Disable/Remove Postfix MTA, Avahi and Chrony Services

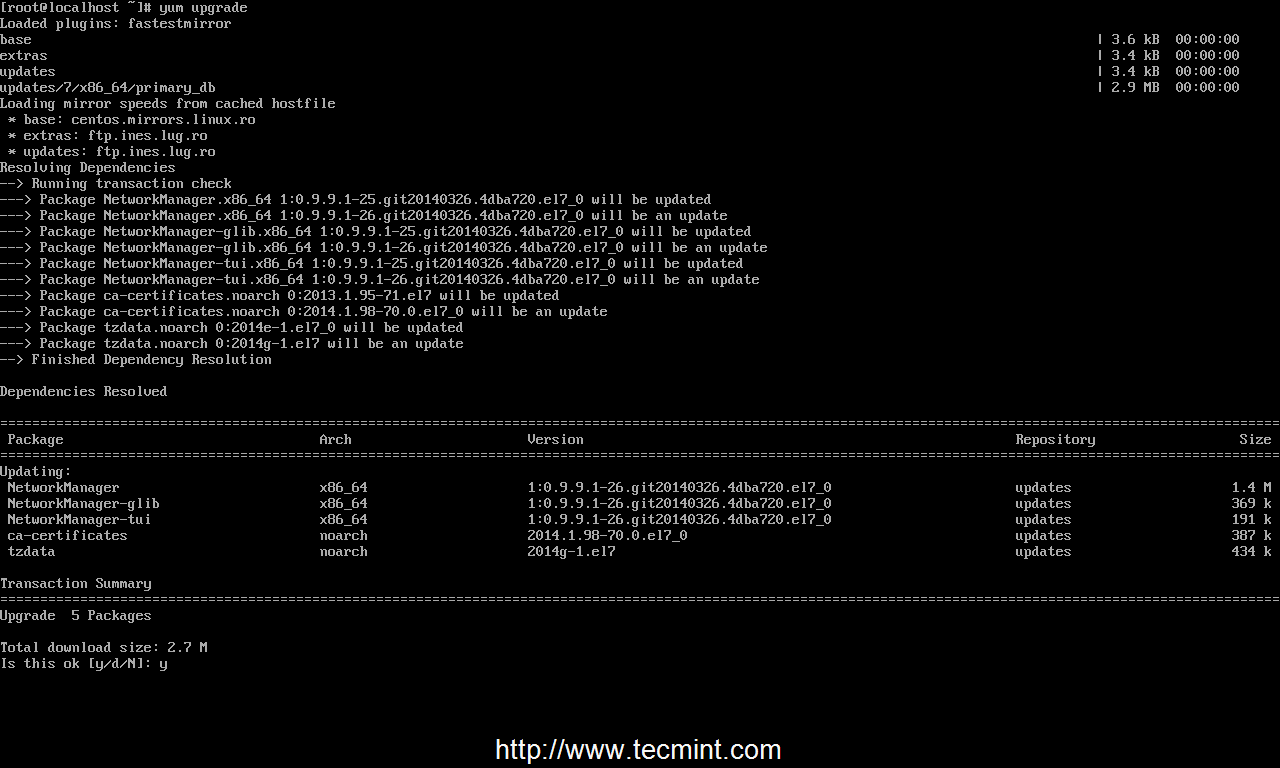
1. After the installation finishes, login on your server with root account or a user with root privileges and perform a system update, to make sure that your system is up-to-date with all packages and security patches.
# yum upgrade
Upgrade CentOS 7
Upgrade System
2. The next step would be to install some useful system utilities using YUM Package Manager, such as net-tools (this package provides the older
but good ifconfig command), nano text editor, wget and curl for URL transfers, lsof (to list your open files) and bash-completion, which auto completes typed commands.
# yum install nano bash-completion net-tools wget curl lsof
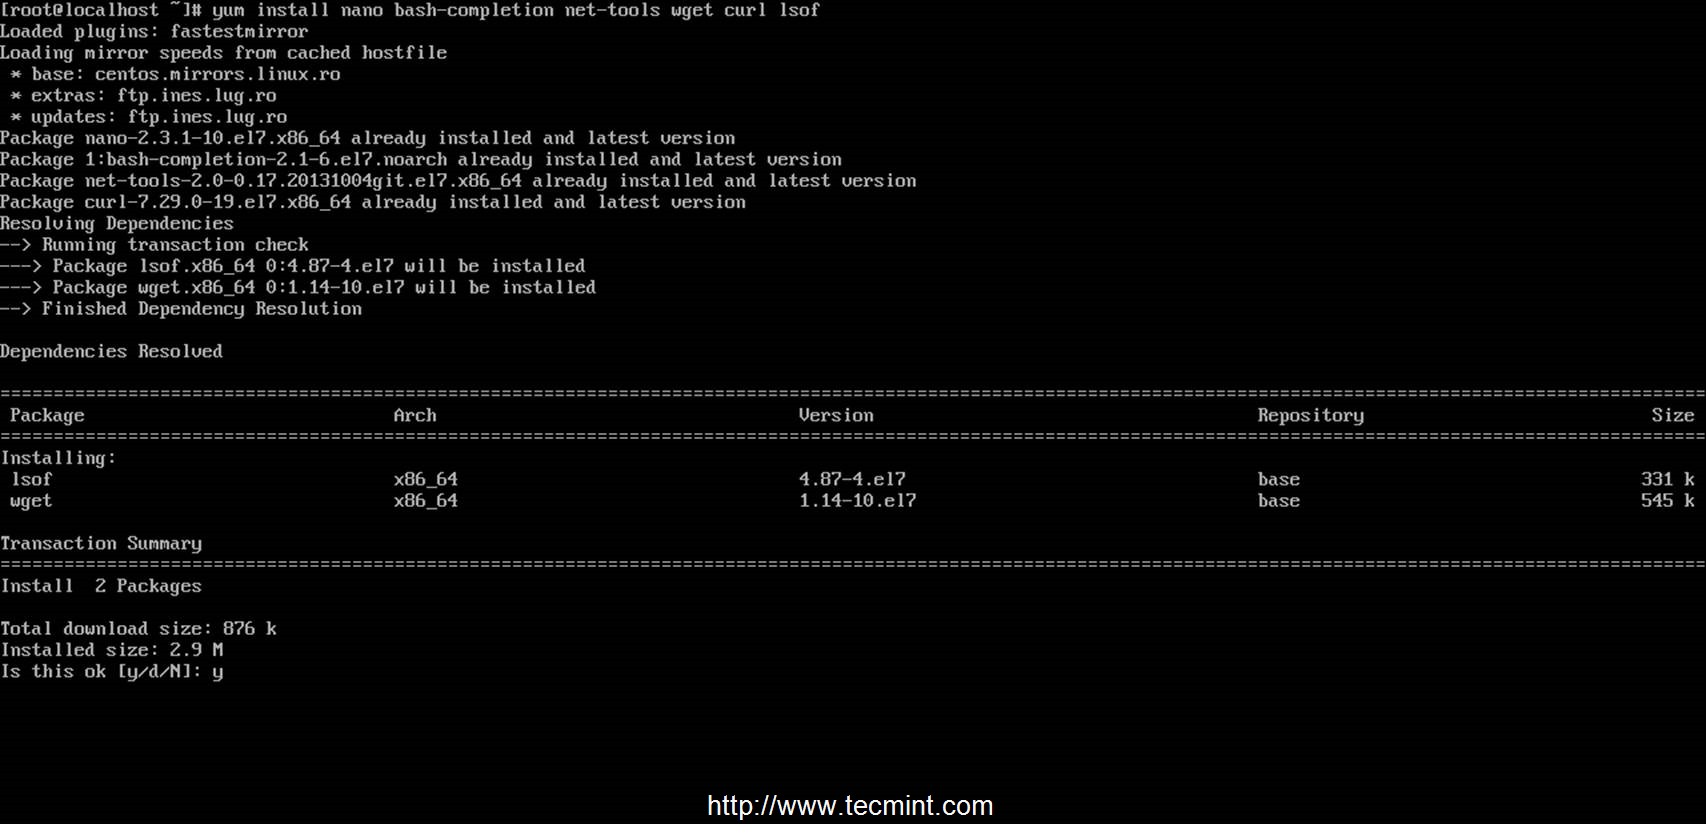
Install System Utilities in CentOS
Install System Utilities
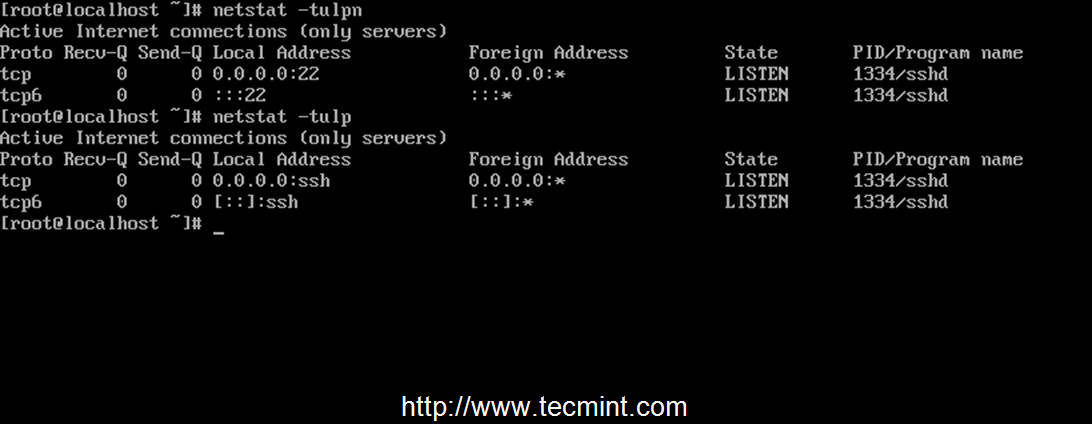
3. Now you can start disabling and remove pre-installed unwanted services. First of all get a list of all your enabled and running services by running netstat command against TCP, UDP and Listen state network sockets.
# netstat -tulpn   ## To output numerical service sockets

# netstat -tulp       ## To output literal service sockets
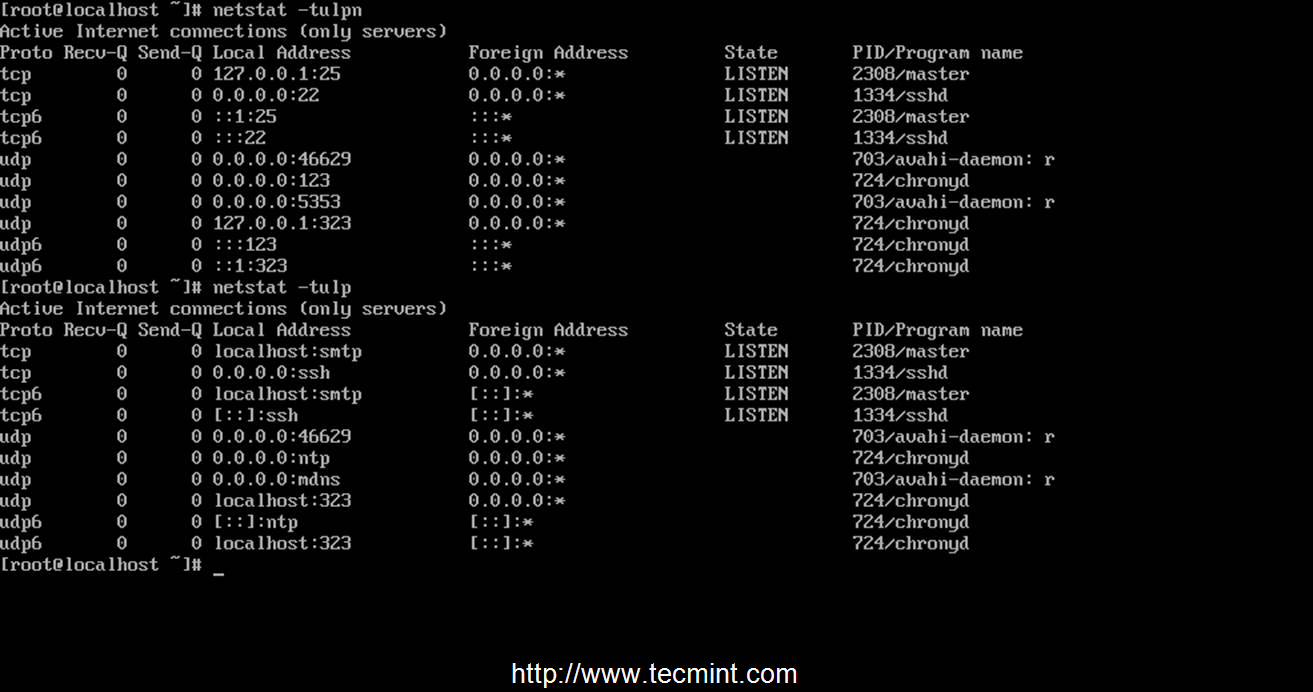
List Enabled Services
4. As you can see Postfix is started and listens on localhost on port 25, Avahi daemon binds on all network Interfaces and Chronyd service binds on localhost and all network interfaces on different ports. Proceed with Postfix MTA service removal by issuing the following commands.
# systemctl stop postfix
# yum remove postfix
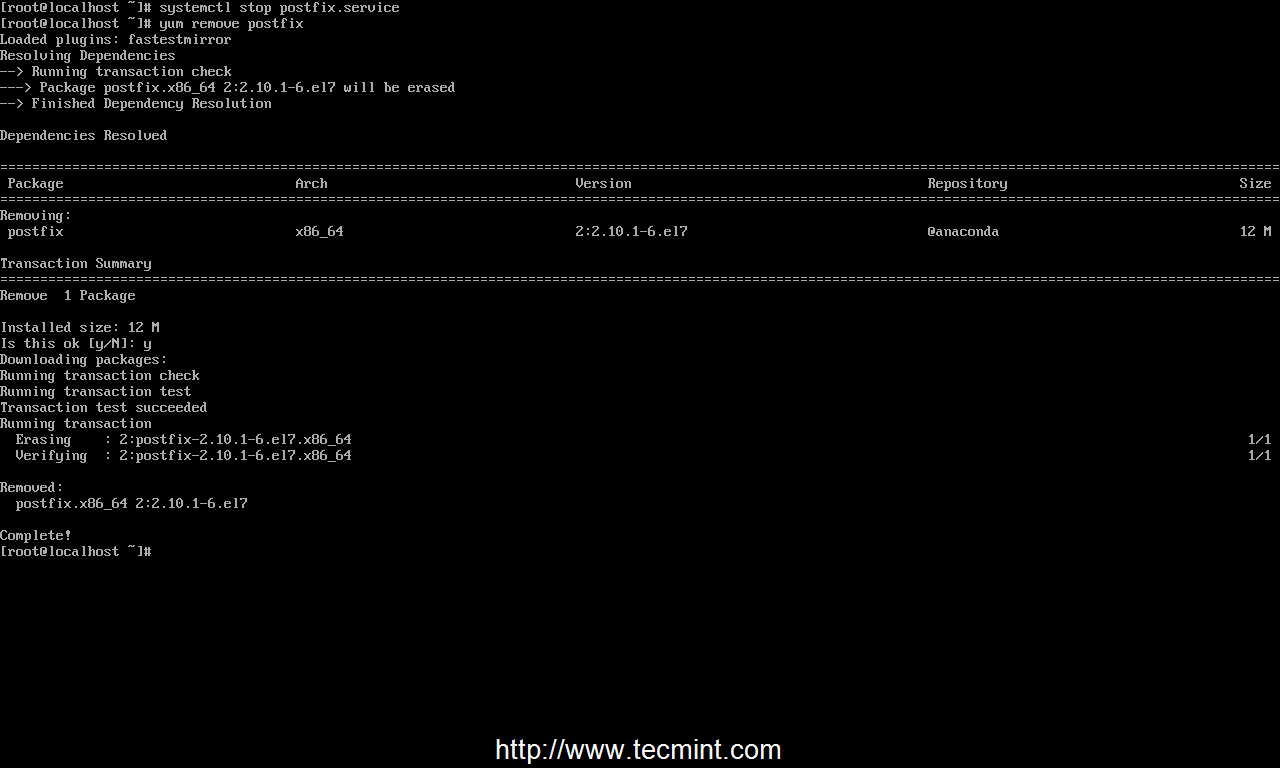
Remove Postfix Service in CentOS
Remove Postfix Service
5. Next remove Chronyd service, which will be replaced by NTP server, by issuing the following commands.
# systemctl stop chronyd
# yum remove chrony
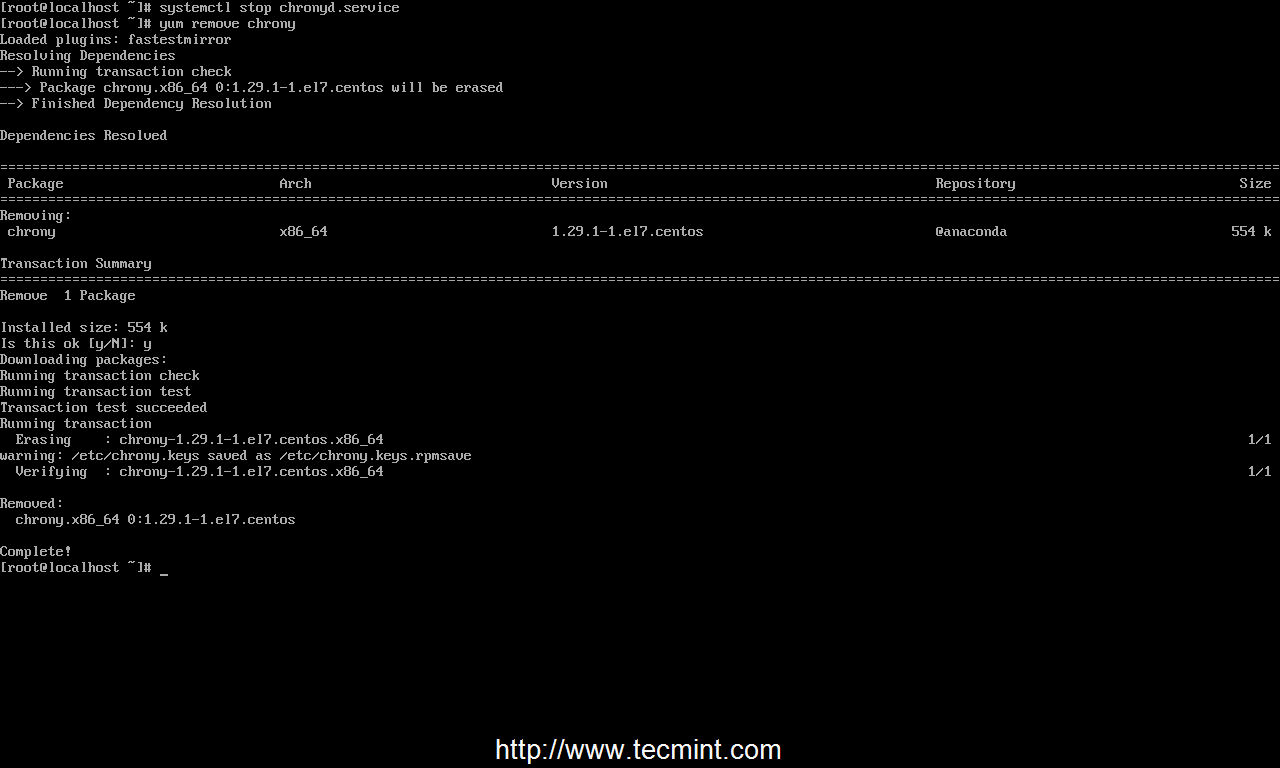
Remove Chronyd Service in CentOS
Remove Chronyd Service
6. Now it’s time to remove Avahi daemon. Looks like in RHEL/CentOS 7 Avahi daemon is strongly tight and depends on Network Manager service. Performing Avahi daemon removal can leave your system without any network connections.
So, pay extra attention to this step. If you really need automatic network configuration provided by Network Manager or you need to edit your interfaces
through nmtui network and interface utility, then you should only stop and disable Avahi daemon and perform no removal at all.
If you still want to completely remove this service then you must manually edit network configuration files located in /etc/sysconfig/network-scripts/ifcfg-interface_name, then start and enable networking service.
Issue the following commands to remove Avahi mdns daemon. Caution: Do not attempt to remove Avahi daemon if you connected through SSH.
# systemctl stop avahi-daemon.socket avahi-daemon.service
# systemctl disable avahi-daemon.socket avahi-daemon.service
--------- Stop here if you don't want removal --------- 

# yum remove avahi-autoipd avahi-libs avahi
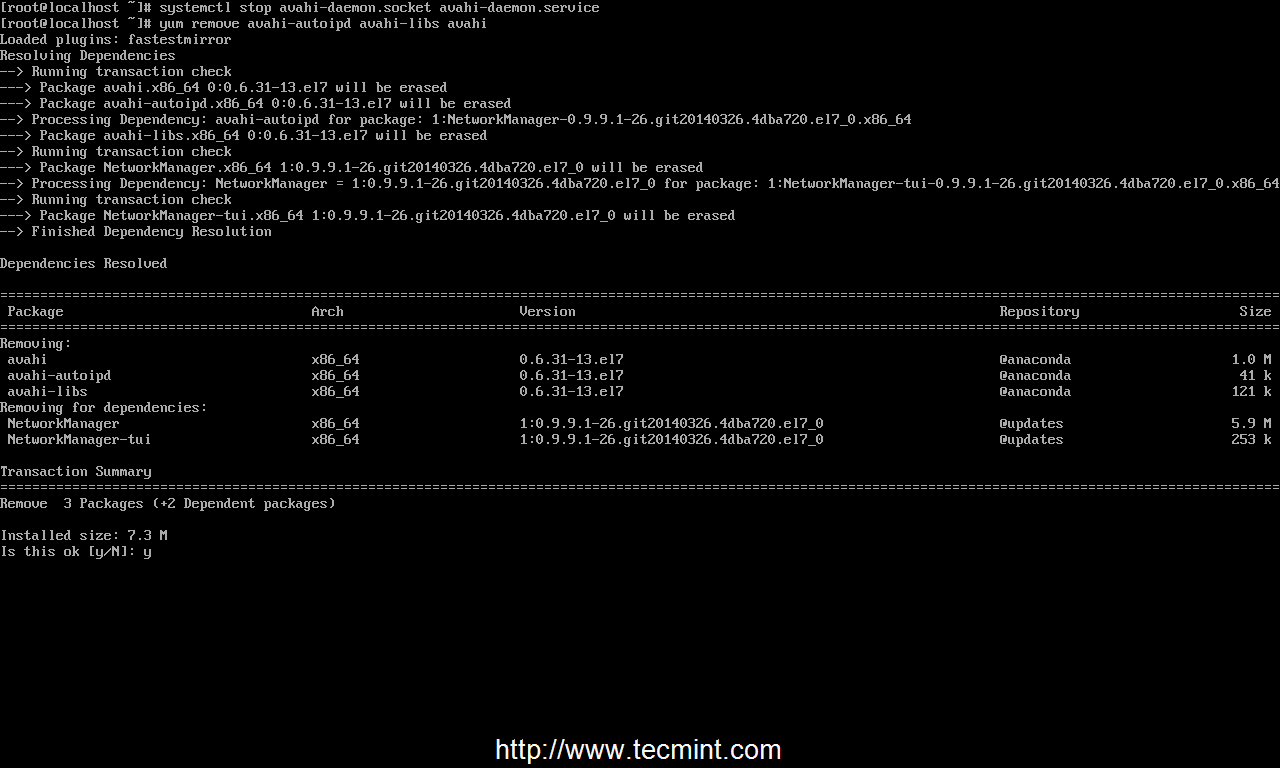
Remove Avahi Daemon in CentOS
Remove Avahi Daemon
7. This step is required only if you removed Avahi daemon and your network connections crashed and you need to manually configure Network Interface Card again.
To edit your NIC to use IPv6 and static IP Address, go to /etc/sysconfig/network-scripts/ path, open NIC interface file (usually the first card is named ifcfg-eno1677776 and is already configured by Network Manager) and use the following excerpt as a guide in case your
network interface has no configuration.
IPV6INIT=no
IPV6_AUTOCONF=yes
BOOTPROTO=none
DEVICE=eno16777736
ONBOOT=yes
UUID=c3f0dc21-d2eb-48eb-aadf-10a520b13df0
TYPE=Ethernet
#DEFROUTE=no
IPV4_FAILURE_FATAL=no
IPV6_DEFROUTE=no
IPV6_FAILURE_FATAL=no
NAME="System eno16777736"
IPV6_PEERDNS=yes
IPV6_PEERROUTES=yes
HWADDR=00:0C:29:E2:06:E9
                IPADDR=192.168.1.25
                NETMASK=255.255.255.0
                GATEWAY=192.168.1.1
                DNS1=192.168.1.1
                DNS2=8.8.8.8
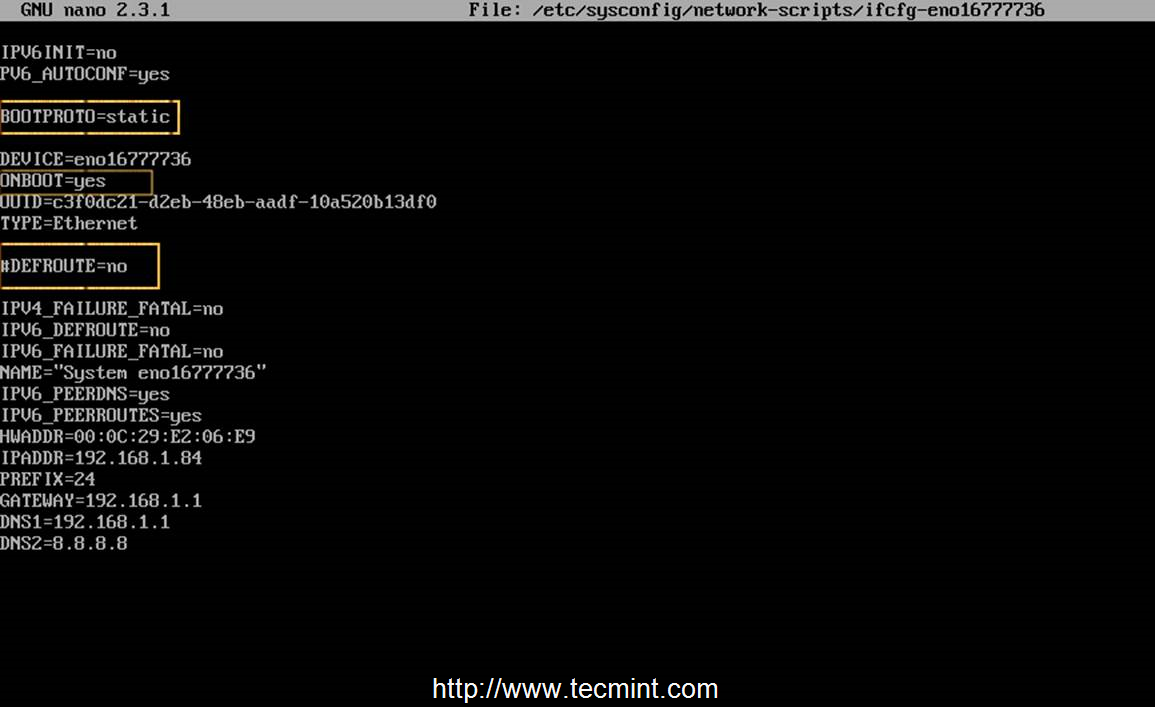
Configure Network Interface in CentOS
Configure Network Interface
The most important settings here you should take into consideration are:
  1. BOOTPROTO – Set to none or static – for static IP Address.
  2. ONBOOT – Set to yes – to bring up your interface after reboot.
  3. DEFROUTE – Statement commented with a # or completely removed – do not use default route (If you use it here you should add “DEFROUTE: no” to all network interfaces, not used as the default route).
8. If your infrastructure has an DHCP Server that automatically assigns IP Addresses, use the following excerpt for Network Interfaces Configuration.
IPV6INIT=no
IPV6_AUTOCONF=yes
BOOTPROTO=dhcp
DEVICE=eno16777736
ONBOOT=yes
UUID=c3f0dc21-d2eb-48eb-aadf-10a520b13df0
TYPE=Ethernet
##DEFROUTE=no
IPV4_FAILURE_FATAL=no
IPV6_DEFROUTE=no
IPV6_FAILURE_FATAL=no
NAME="System eno16777736"
IPV6_PEERDNS=yes
IPV6_PEERROUTES=yes
HWADDR=00:0C:29:E2:06:E9
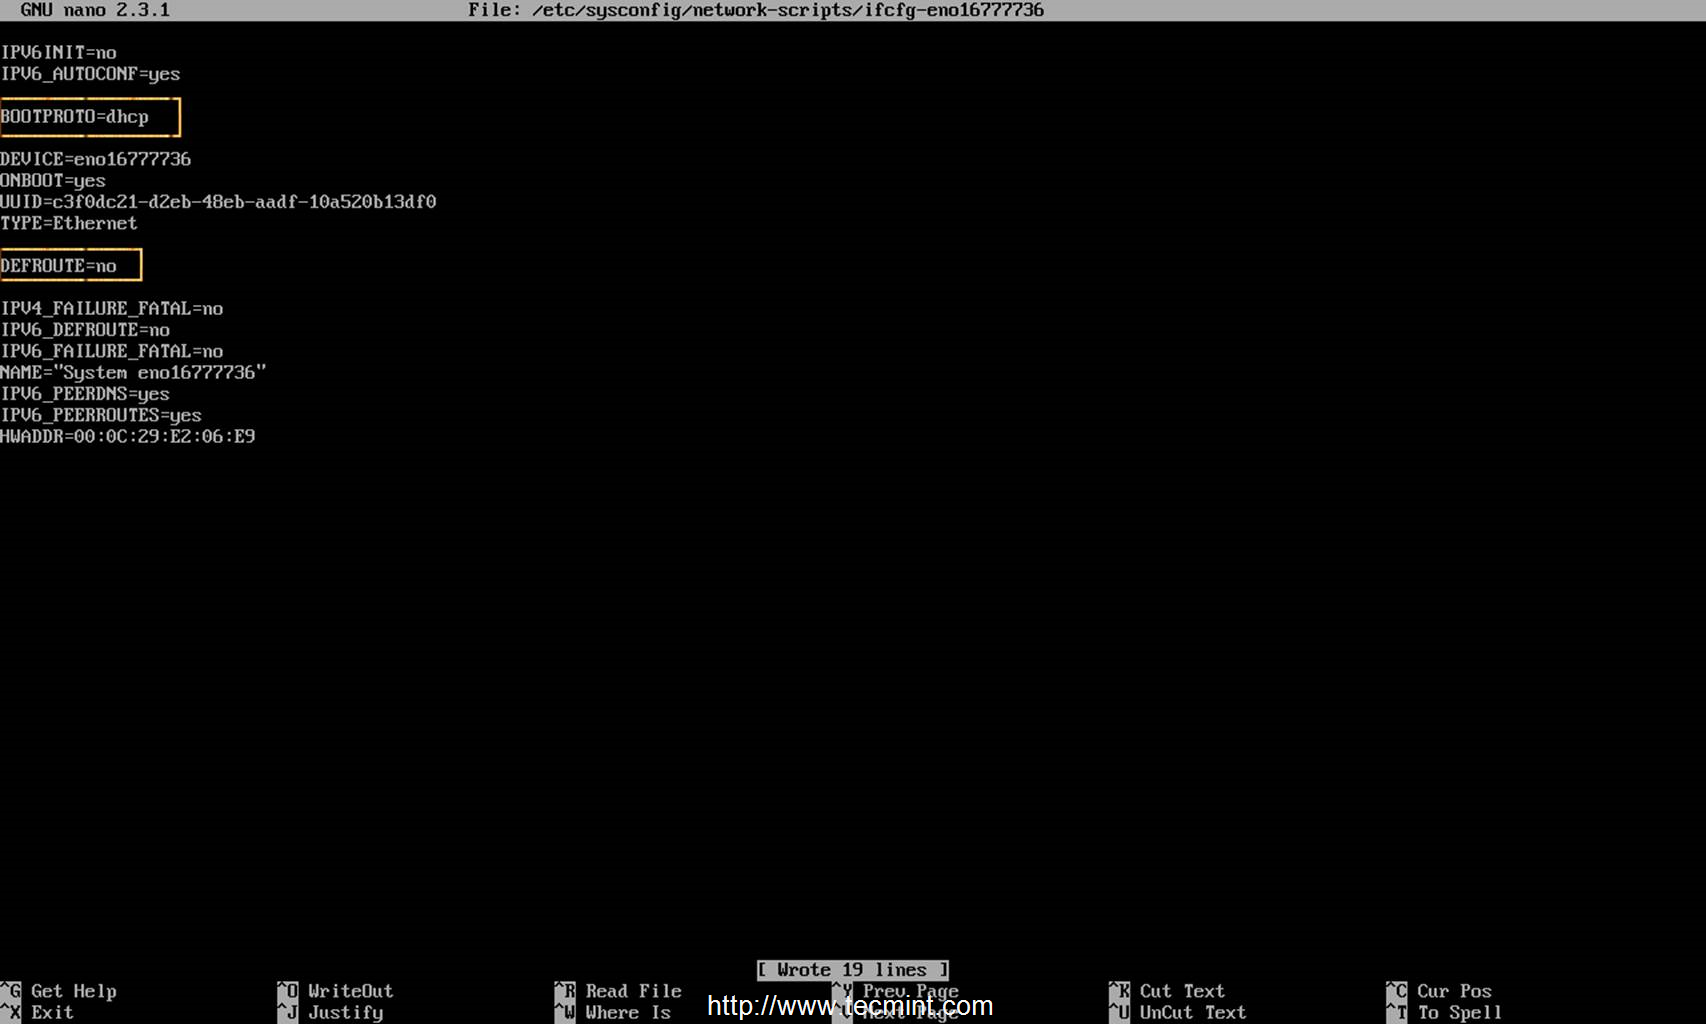
Configure DHCP Interface
Same as the configuration with Static IP Address, assure that BOOTPROTO is set to dhcp, DEFROUTE statement is commented or removed and the device is configured to automatically start on boot. If you don’t use IPv6 just remove or comment all the lines containing IPV6.
9. In order to apply the new configurations for your network interfaces you must restart network service. After you restart network daemon use ifconfig
or ip addr show command to get your interface settings and try to ping a domain name to see if network is functional.
# service network restart ## Use this command before systemctl
# chkconfig network on
# systemctl restart network
# ifconfig
# ping domain.tld
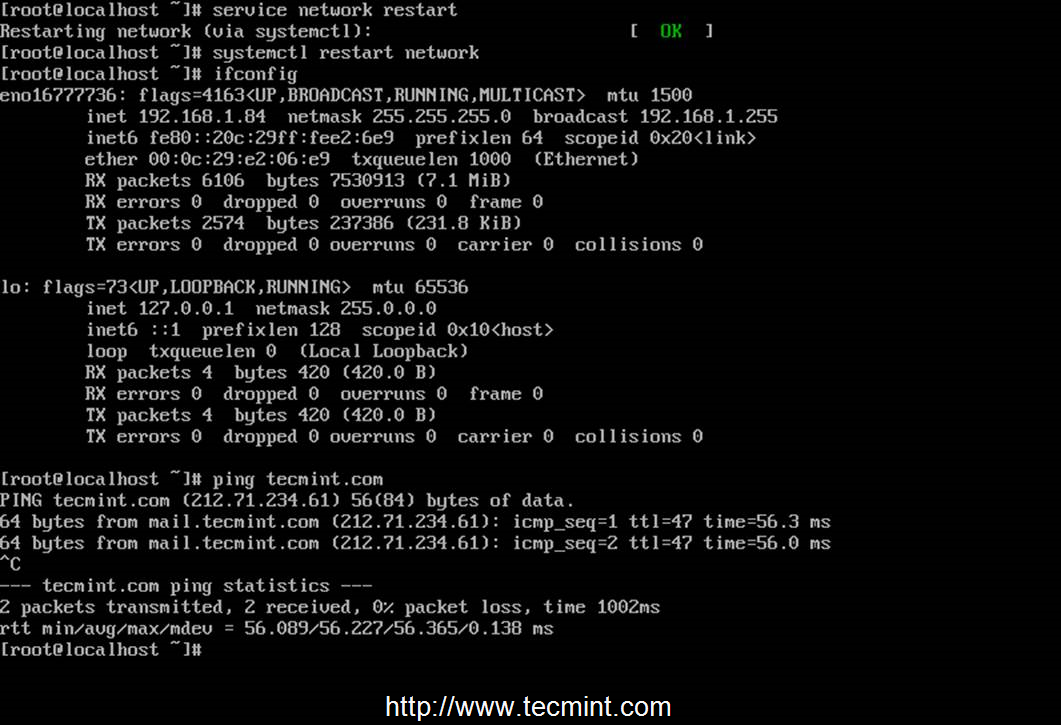
Confirm Network Settings
10. As a final setting make sure you set up a name for system hostname using hostnamectl utility and review your configuration with hostname command.
# hostnamectl set-hostname FQDN_system_name
# hostnamectl status
# hostname
# hostname -s    ## Short name
# hostname -f    ## FQDN name
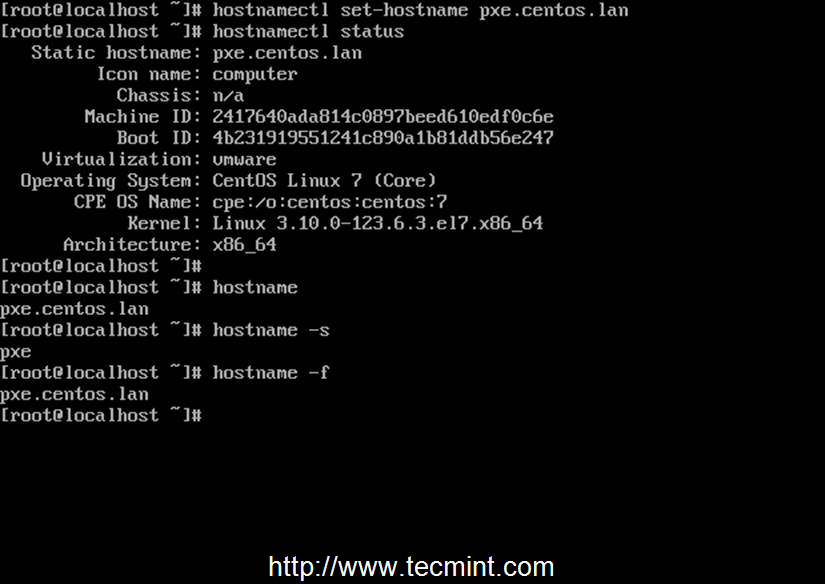
Setup System Hostname in CentOS 7
Setup System Hostname
11. That’s all! As a final test run netstat command again to get a look of what services are running on your system.
# netstat -tulpn
# netstat -tulp
Verify Running Services
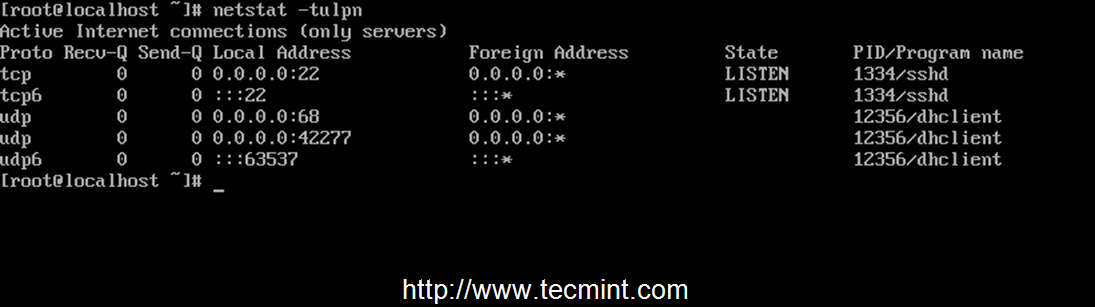
12. Besides SSH server, if your network uses DHCP to pull dynamic IP configurations, a DHCP Client should run and be active on UDP ports.
# netstat -tulpn
Verify DHCP Service
Verify DHCP Service
13. As an alternative to netstat utility you can output your running network sockets with the help of Sockets Statistics command.
# ss -tulpn 
ss Command to Check Network
14. Reboot your server and run systemd-analize command to determine your system boot-up time performance and, also, use free and Disk
Free
command to display RAM and HDD statistics and top command to see a top of the most used system resources.
# free -h
# df -h
# top 

Check System Boot Time in Linux
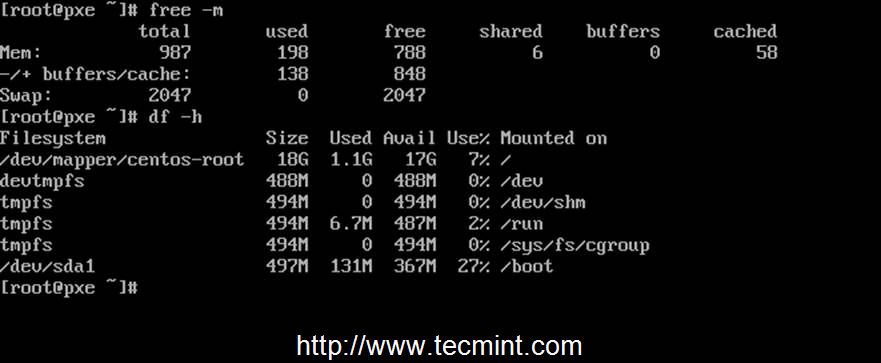
Check System Boot Time
Check Memory and Disk Usage
Congratulations! Now you have a clean minimal RHEL/CentOS 7 system environment with less services installed and running and more resources available for future configurations.

Setting Up “NTP (Network Time Protocol) Server” in RHEL/CentOS 7

Network Time Protocol – NTP- is a protocol which runs over port 123 UDP at Transport Layer and allows computers to synchronize time over networks for an accurate time. While time is passing by, computers internal clocks tend to drift which can lead to inconsistent time issues, especially on servers and clients logs files or if you want to replicate servers resources or databases.
NTP Server Install in CentOS
NTP Server Installation in CentOS and RHEL 7

Requirements:

  1. CentOS 7 Installation Procedure
  2. RHEL 7 Installation Procedure

Additional Requirements:

  1. Register and Enbale RHEL 7 Subscription for Updates
  2. Configure Static IP Address on CentOS/Rhel 7
  3. Disable and Remove Unwanted Services in CentOS/RHEL 7
This tutorial will demonstrate how you can install and configure NTP server on CentOS/RHEL 7 and automatically synchronize time with the closest geographically peers available for your server location by using NTP Public Pool Time Servers list.

Step 1: Install and configure NTP daemon

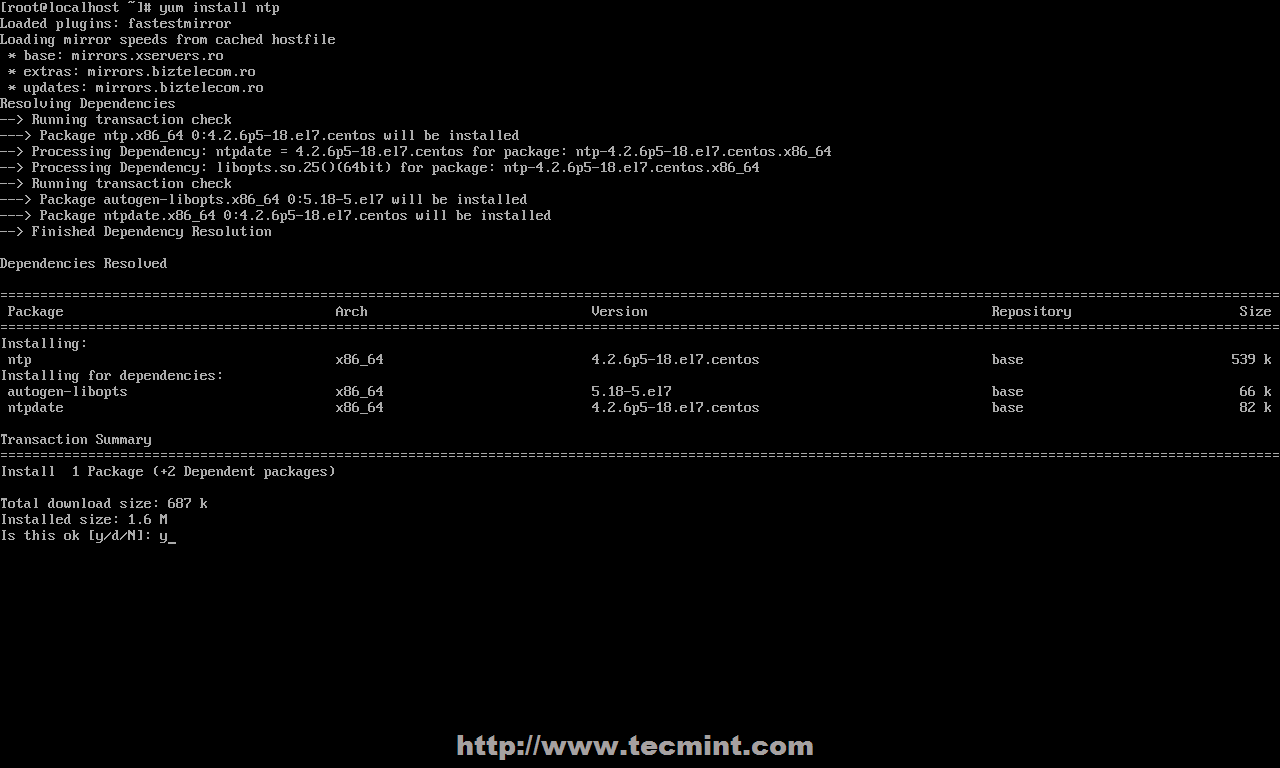
1. NTP server package is provided by default from official CentOS /RHEL 7 repositories and can be installed by issuing the following command.
# yum install ntp
Install NTP in CentOS
Install NTP Server
2. After the server is installed, first go to official NTP Public Pool Time Servers, choose your Continent area where the server physically is located, then search for your Country location and a list of NTP servers should appear.
NTP Pool Server
NTP Pool Server
3. Then open NTP daemon main configuration file for editing, comment the default list of Public Servers from pool.ntp.org project and replace it with the list provided for your country like in the screenshot below.
Configure NTP Server in CentOS
Configure NTP Server
4. Further, you need to allow clients from your networks to synchronize time with this server. To accomplish this, add the following line to NTP configuration file, where restrict statement controls, what network is allowed to query and sync time – replace network IPs accordingly.
restrict 192.168.1.0 netmask 255.255.255.0 nomodify notrap
The nomodify notrap statements suggest that your clients are not allowed to configure the server or be used as peers for time sync.
5. If you need additional information for troubleshooting in case there are problems with your NTP daemon add a log file statement which will record all NTP server issues into one dedicated log file.
logfile /var/log/ntp.log
Enable NTP Logs in CentOS
Enable NTP Logs
6. After you have edited the file with all configuration explained above save and close ntp.conf file. Your final configuration should look like in the screenshot below.
NTP Server Configuration in CentOS
NTP Server Configuration

Step 2: Add Firewall Rules and Start NTP Daemon

7. NTP service uses UDP port 123 on OSI transport layer (layer 4). It is designed particularly to resist the effects of variable latency (jitter). To open this port on RHEL/CentOS 7 run the following commands against Firewalld service.
# firewall-cmd --add-service=ntp --permanent
# firewall-cmd --reload
Open NTP Port in Firewall
8. After you have opened Firewall port 123, start NTP server and make sure you enable it system-wide. Use the following commands to manage the service.
# systemctl start ntpd
# systemctl enable ntpd
# systemctl status ntpd
Start NTP Service
Start NTP Service

Step 3: Verify Server Time Sync

9. After NTP daemon has been started, wait a few minutes for the server to synchronize time with its pool list servers, then run the following commands to verify NTP peers synchronization status and your system time.
# ntpq -p
# date -R
Verify NTP Server Time
Verify NTP Time Sync
10. If you want to query and synchronize against a pool of your choice use ntpdate command, followed by the server or servers addresses, as suggested in the following command line example.
# ntpdate -q  0.ro.pool.ntp.org  1.ro.pool.ntp.org
Synchronize NTP Time

Step 4: Setup Windows NTP Client

11. If your windows machine is not a part of a Domain Controller you can configure Windows to synchronize time with your NTP server by going to Time from the right side of Taskbar -> Change Date and Time Settings -> Internet Time tab -> Change Settings -> Check Synchronize with an Internet time server -> put your server’s IP or FQDN on Server filed -> Update now -> OK.
Synchronize Windows Time with NTP
That’s all! Setting up a local NTP Server on your network ensures that all your servers and clients have the same time set in case of an Internet connectivity failure and they all are synchronized with each other.

Setting Up Prerequisites to ‘Install Windows 7’ over ‘PXE Network Boot Server’ on RHEL/CentOS 7 – Part 1

Continuing the series of tutorials regarding RHEL/CentOS 7 PXE Network Boot Server Environment, where so far I have only discussed integrating and installing Linux distributions over PXE Server.

Configure PXE Server to Install Windows
This tutorial will be concentrate around Windows based systems and will show you how to add and manually install Windows 7, both 32-bit and 64-bit architectures, over a PXE Server and Samba shares.

Requirements

  1. Install PXE Network Boot Server for Multiple OS Installations in RHEL/CentOS 7
  2. A Samba fully accessed directory share setup on PXE Server machine.
  3. A computer with Windows 7 operating system installed.
  4. Windows Automated Installation Kit (AIK) installed on Windows 7 computer.
  5. Both Windows 7 32-bit/64-bit DVD ISO Images.
Before proceeding with the installation process, I will explain how this guide is structured.
The first part will cover the configurations needed to setup the environment on RHEL/CentOS 7 PXE Server premises, by installing and configuring a Samba fully accessed shared directory with no authentication needed, where both Windows 7 system architecture images will be deployed, and, also, editing PXE Server default configuration file with the options needed to boot WinPE ISO Image in order to manually proceed with Windows installation process.
The second part will be focused on building WinPE ISO image (Windows Preinstallation Enironment) with the help of Windows Automated Installation Kit (AIK) installed on a Windows 7 computer premises. This image will be then transferred to PXE Server machine via Samba shared directory and moved to TFTP server default location.
The next steps that should be made on the client-side in order to boot, access and install Windows 7 over network.

Step 1: Install and Setup Samba Share on PXE Server

1. On the first step, login to PXE Server with root account and setup a fully accessed Samba share, where Windows 7 DVD installation sources will be deployed. Install Samba daemon by issuing the following command.
# yum install samba samba-common samba-winbind 
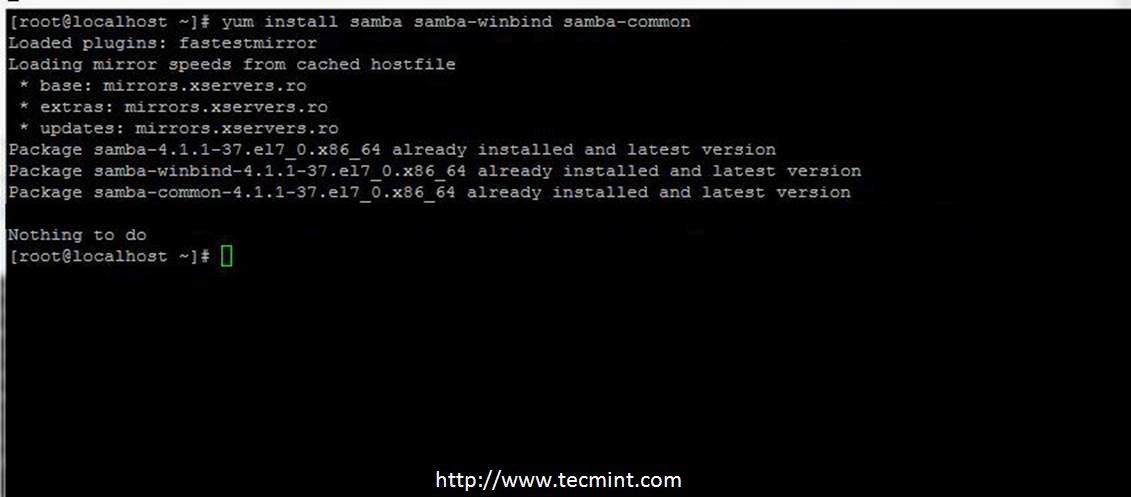
Install Samba on CentOS 7
Install Samba on PXE
2. Next, backup samba main configuration file and create a new configuration file with your favourite text editor by running the following commands.
# mv /etc/samba/smb.conf /etc/samba/smb.conf.backup
# nano /etc/samba/smb.conf
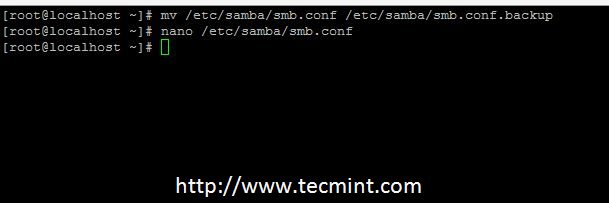
Backup Samba Configuration
3. Now add the following configurations to samba main file as presented in the below file excerpt.
[global]
        workgroup = PXESERVER
        server string = Samba Server Version %v
        log file = /var/log/samba/log.%m
        max log size = 50
        idmap config * : backend = tdb
        cups options = raw
        netbios name = pxe
        map to guest = bad user
        dns proxy = no
        public = yes
        ## For multiple installations the same time - not lock kernel
        kernel oplocks = no
        nt acl support = no
        security = user
        guest account = nobody

[install]
        comment = Windows 7 Image
        path = /windows
        read only = no
        browseable = yes
        public = yes
        printable = no
        guest ok = yes
        oplocks = no
        level2 oplocks = no
        locking = no
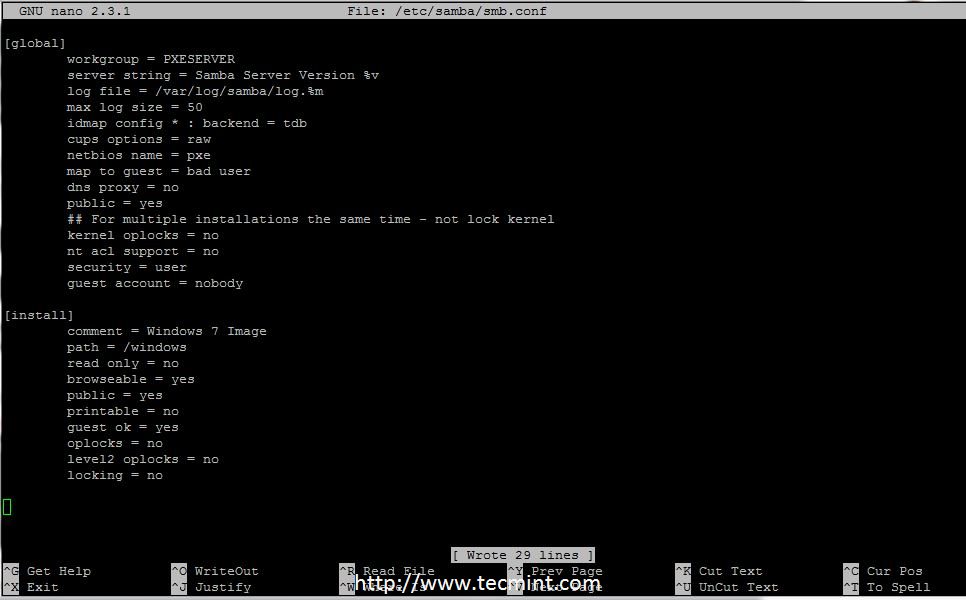
Configure Samba in CentOS 7
Configure Samba for PXE
As you can see from this configuration file, I have created a shared folder named install which is located under /windows system path (on this path will copy Windows 7 DVD installation sources).
4. After finishing editing main samba configuration file run testparm command in order to check and validate the file for eventual errors or misconfigurations.
# testparm
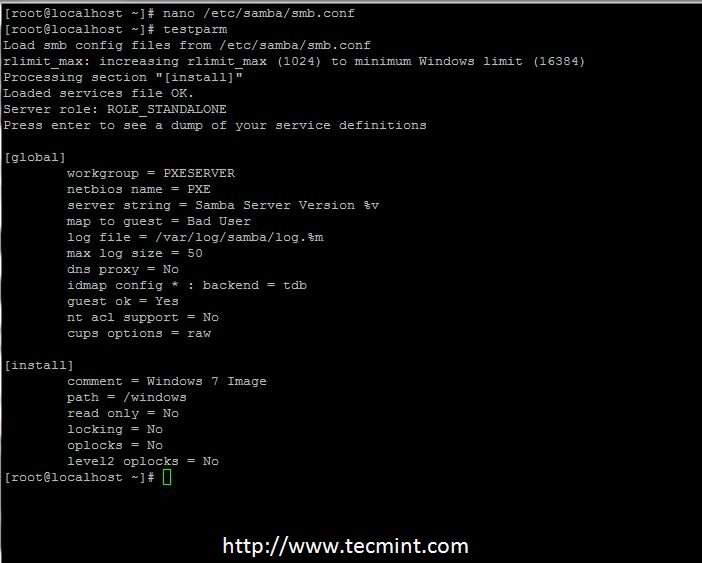
Check Samba Configuration
5. On the next step create the /windows directory under root path (the directory defined in samba conf file) and add SELinux contextual rules in
order to be fully accessed in case your system has enforced SELinux security.
# mkdir /windows
# semanage fcontext -a -t samba_share_t ‘/windows(/.*)?’
# restorecon -R -v /windows
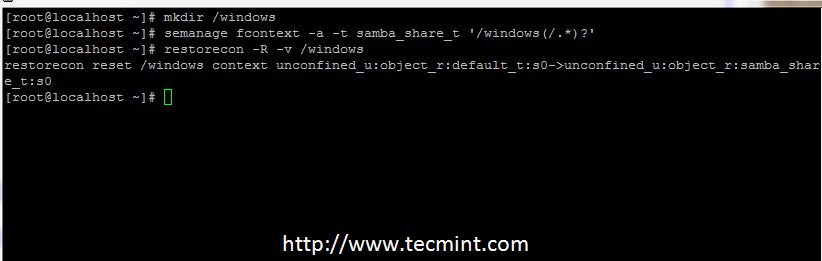
Add Samba Selinux Rules

Step 2: Deploy Windows 7 Installation Sources on PXE Server

6. For this step both Windows 7 ISO DVD Images are needed. But before mounting and copy DVD content create two directories under /windows path
to separate Windows installation sources architectures.
# mkdir /windows/x32
# mkdir /windows/x64
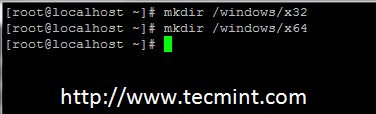
Create Windows Install Sources on PXE
7. Now it’s time to copy Windows Installation Sources to the paths created above. First put Windows 7 32-bit DVD Image ISO on your machine DVD drive, mount the image to /mnt path and copy all DVD mounted content to samba shared directory /windows/x32/. The transfer process can take a while depending on your system resources, and, after it finishes, unmount Windows 7 32-bit DVD Image.
# mount -o loop /dev/cdrom /mnt
# cp -rf  /mnt/*  /windows/x32/
# umount  /mnt
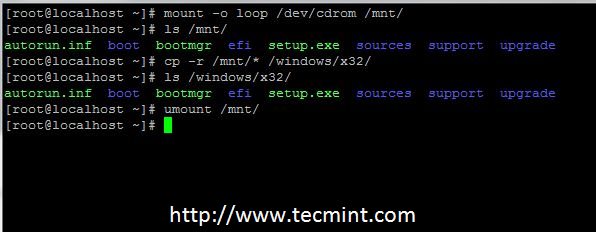
Mount Windows Install DVD on PXE
8. Repeat the above process with Windows 7 64-bit DVD Image, but this time copy DVD mounted content to /windows/x64/ shared path.
# mount -o loop /dev/cdrom /mnt
# cp -rf  /mnt/*  /windows/x64/
# umount  /mnt
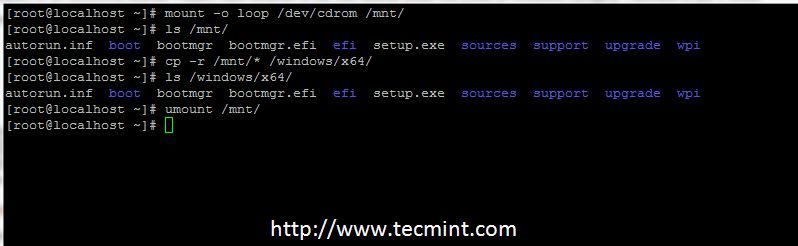
Mount Windows 7 64 bit on PXE
Note: If your PXE server machine doesn’t have a DVD drive you can copy both Windows DVDs contents after you start samba server and access the “install” shared folder from a Windows computer.
9. After both DVD’s images are copied, issue the following commands to setup the right owner and permissions in order to make the share readable and fully accessible without authentication.
# chmod -R 0755 /windows
# chown -R nobody:nobody /windows
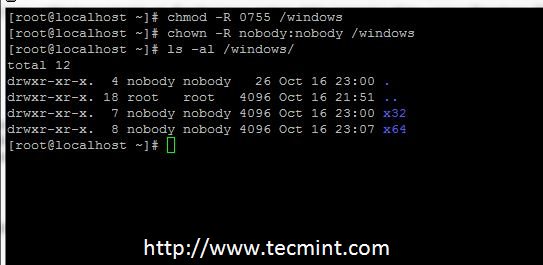
Grant Permission Windows Install Sources

Step 3: Add Firewall Rules, Start and Enable Samba System-Wide

10. If you are using a Firewall on your PXE Server premises, add the following rule to Firewalld service to open Samba to outside connections.
# firewall-cmd --add-service=samba --permanent
# firewall-cmd --reload
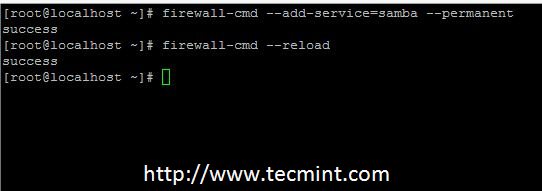
Open Samba in Centos 7 Firewall
Open Samba on Firewall
11. Now, start Samba daemons and enable it system wide, to automatically start after every reboot, by issuing the following commands.
# systemctl restart smb
# systemctl enable smb
# systemctl restart winbind
# systemctl enable winbind
# systemctl restart nmb
# systemctl enable nmb
# systemctl status smb
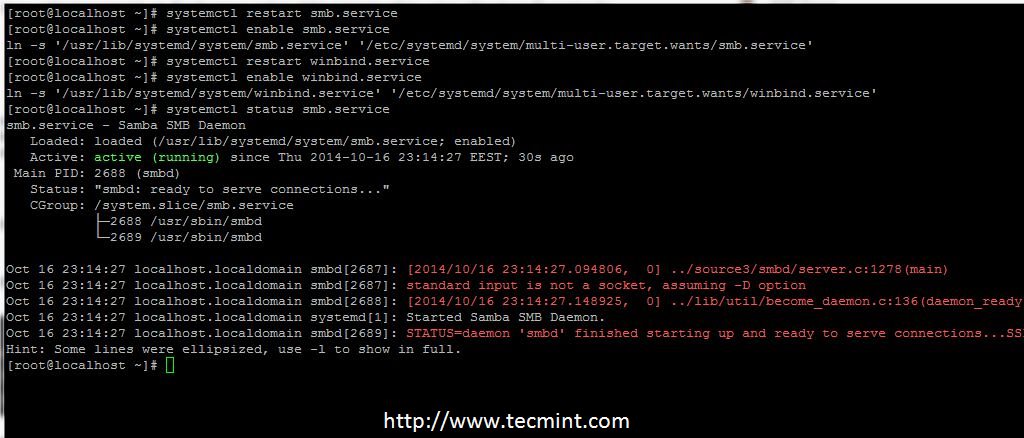
Enable Samba Systemwide in CentOS 7
Enable Samba Systemwide
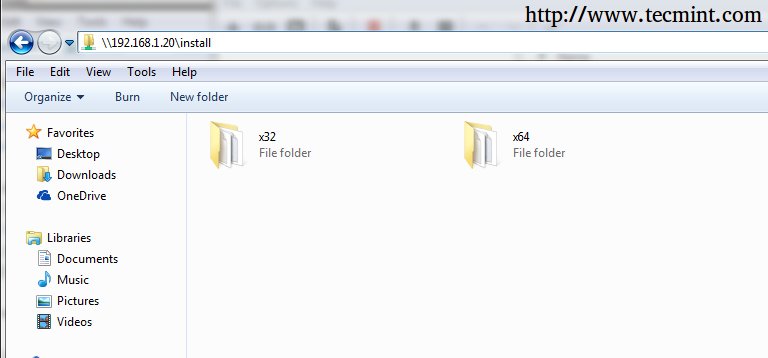
12. To test Samba configuration move to a Windows computer and add the IP Address of your Samba server followed by the shared path name in Windows Explorer address bar and the shared folders should appear.
\\192.168.1.20\install
Check Samba Shares in CentOS 7
Check Samba Shares
At this point you can now use the alternate method explained in the above note, and put Windows 7 ISO Images in your DVD drive and copy their content, depending on the system architecture, to x32 and x64 folders.

Step 4: Configure PXE Server

13. Before editing PXE Menu configuration file, create a new directory named windows on TFTP server default system path. Under this directory you will later copy WinPE ISO image, created on the Windows 7 computer using Windows Automated Installation Kit program.
# mkdir /var/lib/tftpboot/windows
14. Now, open PXE Server default configuration file and add Windows Installation label to PXE menu, as described in the below menu excerpt.
# nano /var/lib/tftpboot/pxelinux.cfg/default
Windows 7 menu label configuration.
label 9
menu label ^9) Install Windows 7 x32/x64
                KERNEL memdisk
                INITRD windows/winpe_x86.iso
                APPEND iso raw
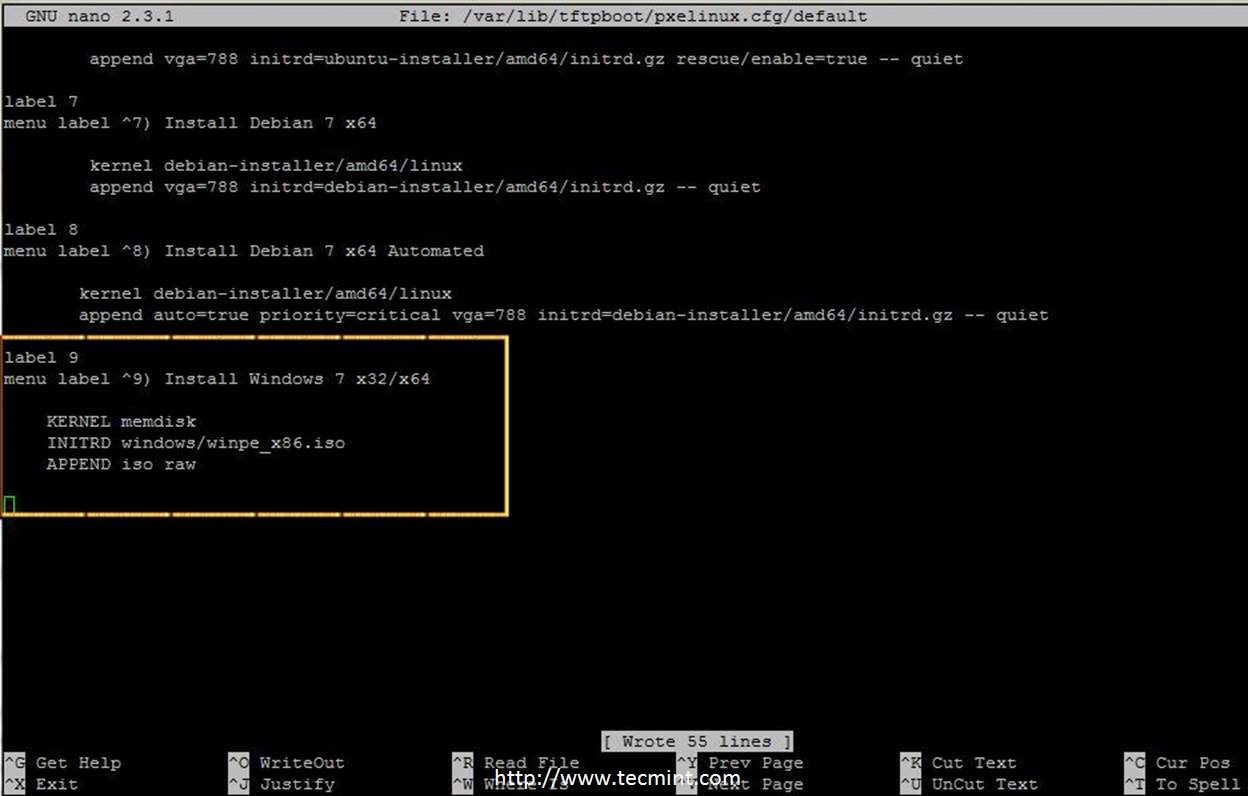
Add Windows 7 to PXE Menu
That’s all you need to setup on RHEL/CentOS 7 PXE Server side. Still, don’t close the console yet, because you will need it later to copy WinPE ISO image to /var/lib/tftpboot/windows/ directory.
Further let’s continue with the procedure and move onto a Windows 7 Installation on PXE Network – Part 2 of this series

Installing Windows 7 over PXE Network Boot Server on RHEL/CentOS 7 using WinPE ISO Image – Part 2

Continuing the series regarding installing Windows 7 over RHEL/CentOS 7 PXE Network Boot, where in the first part I have only covered setting up prerequisites on PXE Server, now in this article will be going to discuss how to build WinPE ISO image with the help of Windows Automated Installation Kit on Windows and then move the build image to PXE Server TFTP default location to access and install Windows 7 over PXE network.
Install Windows 7 over PXE Boot in Linux
Install Windows 7 over PXE Boot in CentOS

Requirements

  1. Configure PXE Server to Install Windows 7 over PXE Network Boot – Part 1

Step 1: Download and Install Windows Automated Installation Kit

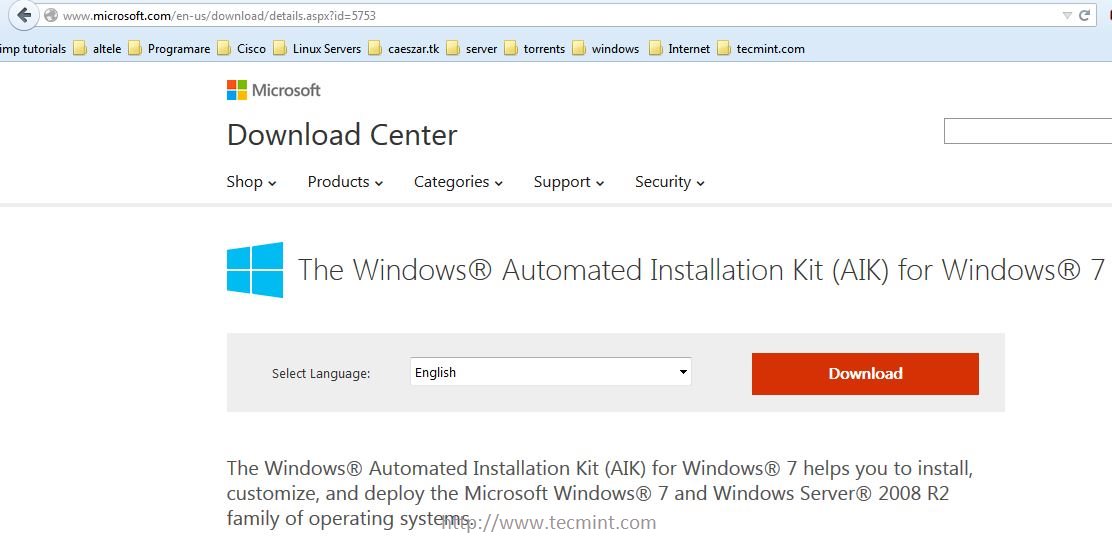
1. On this second part, logon to a Windows 7 Operating System computer, go to Microsoft Download Center and download Windows Automated Installation Kit ISO image file by using the following link.
  1. http://www.microsoft.com/en-us/download/details.aspx?id=5753
Download Windows Automated Installation Kit
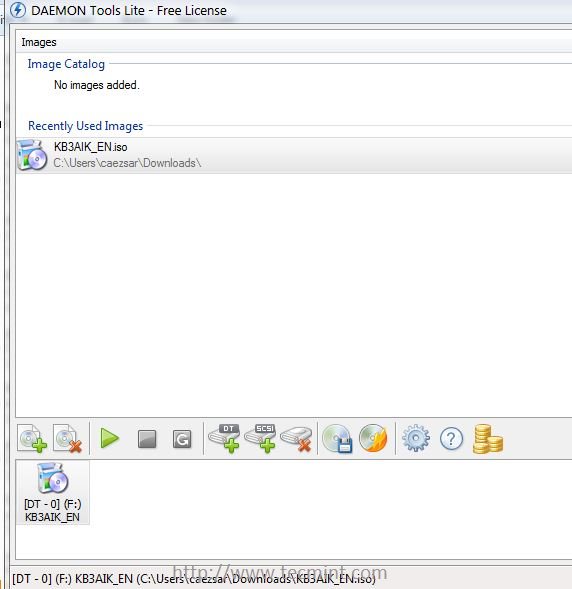
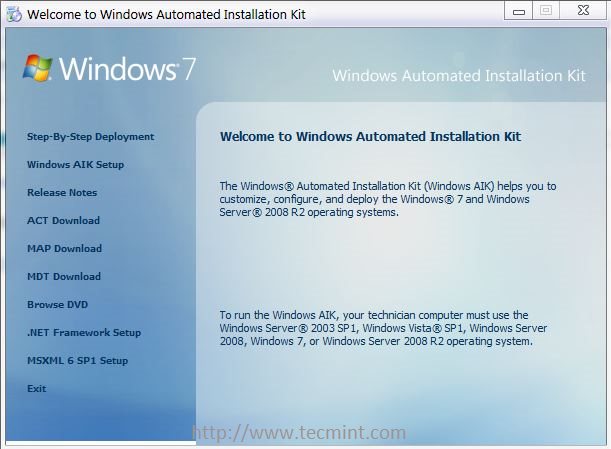
2. After AIK ISO image finishes downloading, mount the image using a Windows mount software (Daemon Tools Lite Free Edition will do the job) and install Windows Automated Installation Kit software.
Mount Windows Automated Installation Kit
Welcome to Windows AIK

Step 2: Create WinPE ISO Image on Windows 7

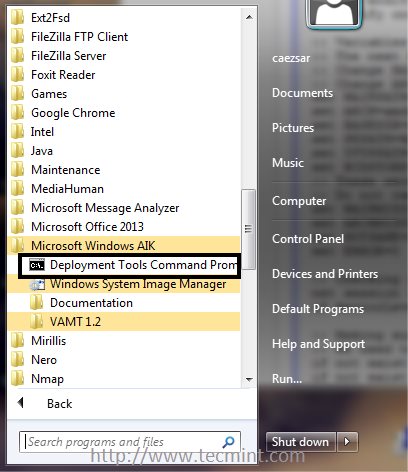
3. After Windows AIK software is installed on your system go to Windows Start -> All Programs -> Microsoft Windows AIK -> right click on Deployment Tools Command Prompt and select Run as Administrator and a new Windows Shell console should open on your screen.
Create WinPE ISO Image
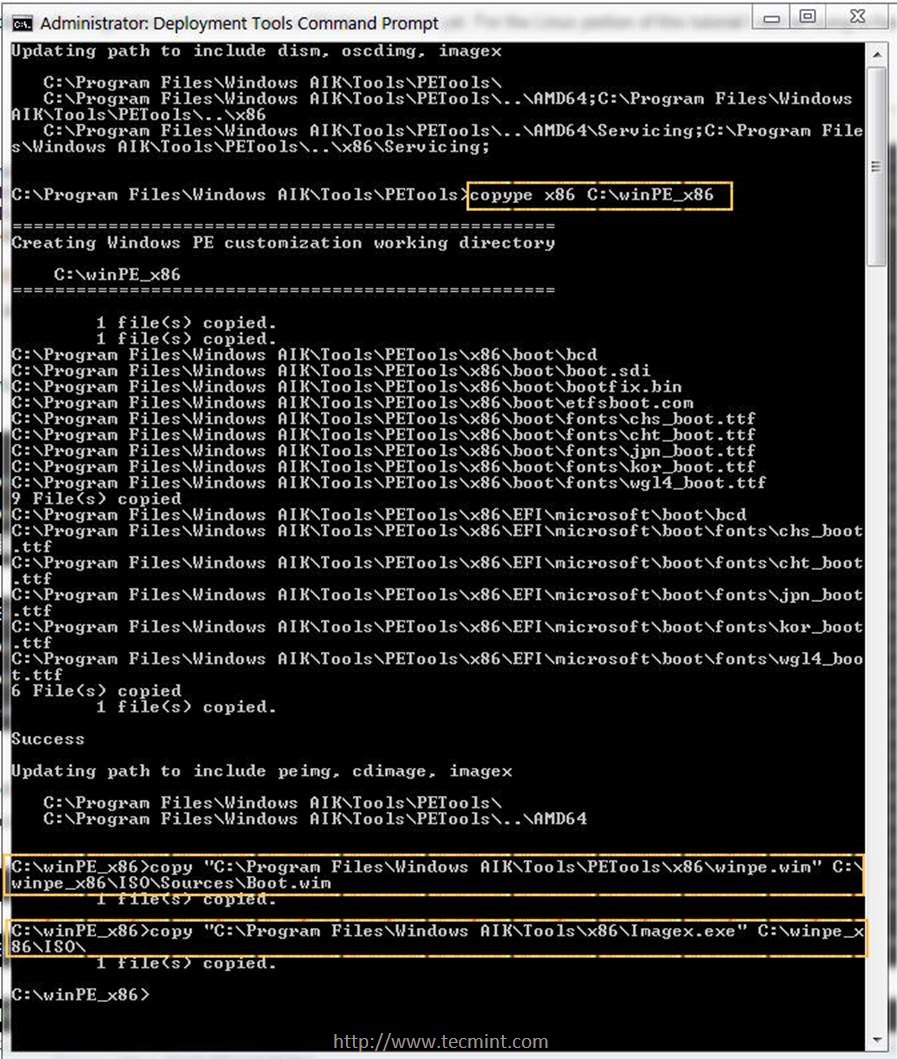
4. Now it’s time to build the Windows 7 Preinstallation Environment (WinPE) x86 boot image by issuing the following commands on Deployment Tools Command Prompt.
copype x86 C:\winPE_x86
copy "C:\Program Files\Windows AIK\Tools\PETools\x86\winpe.wim" C:\winpe_x86\ISO\Sources\Boot.wim
copy "C:\Program Files\Windows AIK\Tools\x86\Imagex.exe" C:\winpe_x86\ISO\
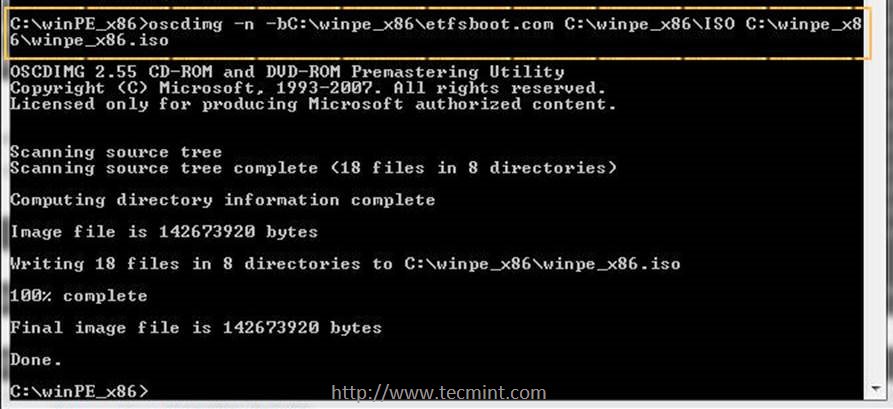
oscdimg -n -bC:\winpe_x86\etfsboot.com C:\winpe_x86\ISO C:\winpe_x86\winpe_x86.iso
Build WinPE Image
Build WinPE Image
Copy WinPE ISO Image
5. Although for this tutorial just the WinPE x86 Boot ISO Image is required, below you can find the commands to build PE Images for Windows 7 64-bit and Windows 8 architectures also.
To build WinPE Boot images for Windows 7 64-bit use the following commands:
copype amd64 C:\winPE_amd64
copy "C:\Program Files\Windows AIK\Tools\PETools\amd64\winpe.wim" C:\winpe_amd64\ISO\Sources\Boot.wim
copy "C:\Program Files\Windows AIK\Tools\amd64\Imagex.exe" C:\winpe_amd64\ISO\
oscdimg -n -bC:\winpe_amd64\etfsboot.com C:\winpe_amd64\ISO C:\winpe_amd64\winpe_amd64.iso
To build Windows 8 32-bit WinPE bootable images run the following commands:
copype x86 C:\Win8PE_x86
MakeWinPEMedia /ISO C:\Win8PE_x86 C:\Win8PE_x86\WinPE_x86.iso
To build Windows 8 64-bit WinPE bootable images run the following commands:
copype amd64 C:\Win8PE_amd64
MakeWinPEMedia /ISO C:\Win8PE_amd64 C:\Win8PE_amd64\Win8PE_amd64.iso

Step 3: Copy WinPE ISO Image to CentOS PXE Server

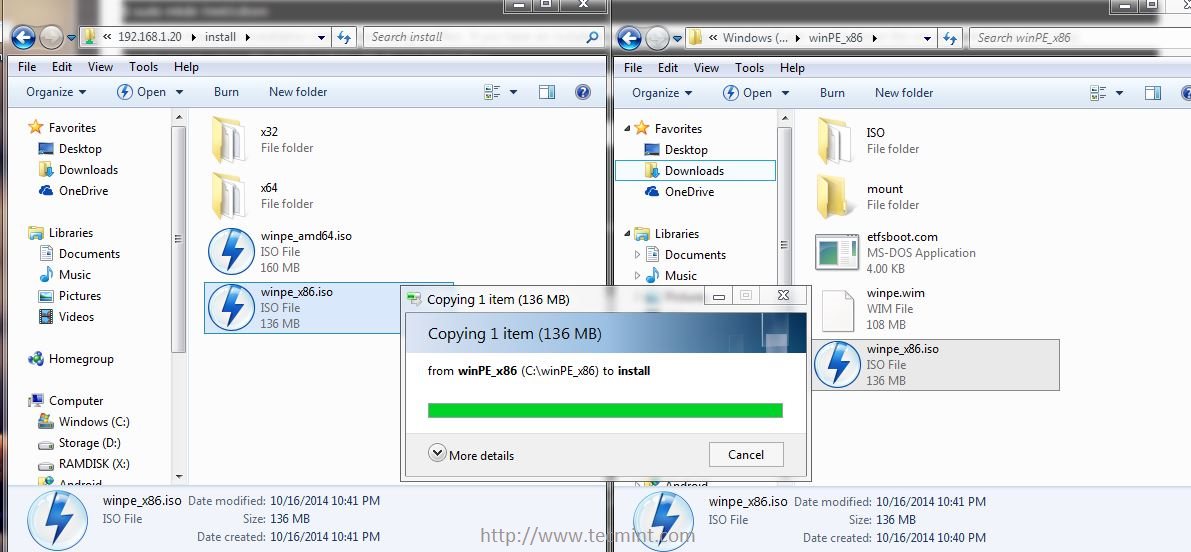
6. After Windows 7 Preinstallation Environment (WinPE) x86 boot image has been created, use Windows Explorer to copy winpe_x86.iso image located in C:\winpe_x86\ windows path to PXE Samba shared directory at \\192.168.1.20\install network location.
Copy WinPE ISO Image PXE Server
7. After WinPE x86 ISO file is completely transferred to Samba “install” shared directory go back to PXE Server console and move this image from root’s /windows directory to TFTP windows directory path to complete the entire installation process.
# mv /windows/winpe_x86.iso  /var/lib/tftpboot/windows/

Step 4: Boot and Install Windows 7 over PXE Network on Client Side

8. In order to boot and install Windows 7 via network and PXE server, first instruct the clients machines to boot over network by modifying BIOS device boot order or hit a custom key during BIOS post to select a network boot device.
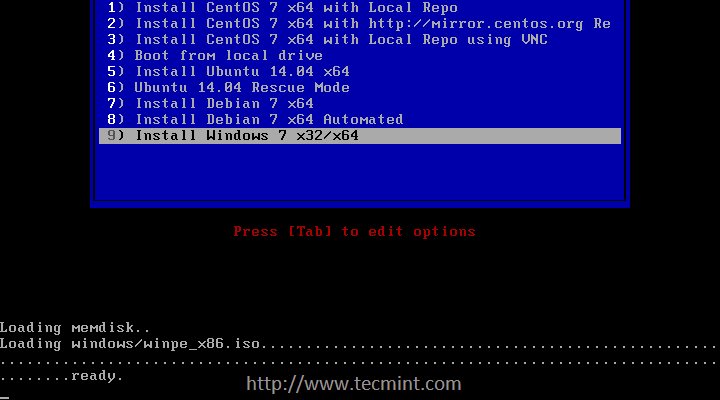
After the first PXE prompt appears press F8 and Enter keys to continue and then select Install Windows 7 from PXE menu.
Select Windows 7 from PXE Menu
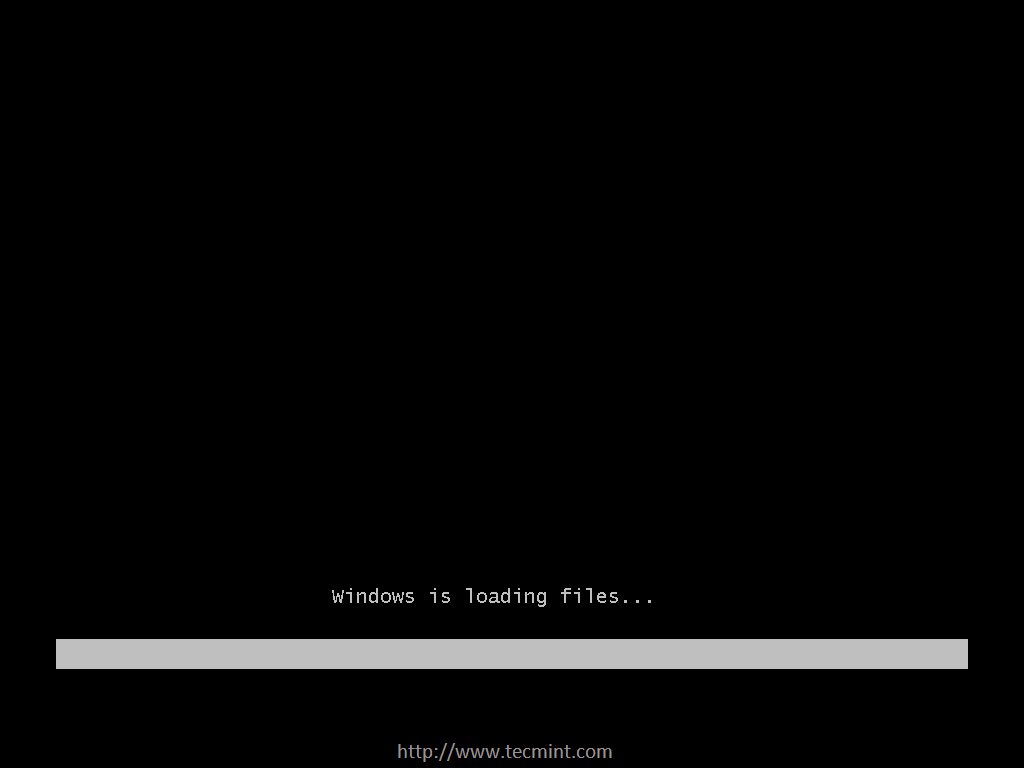
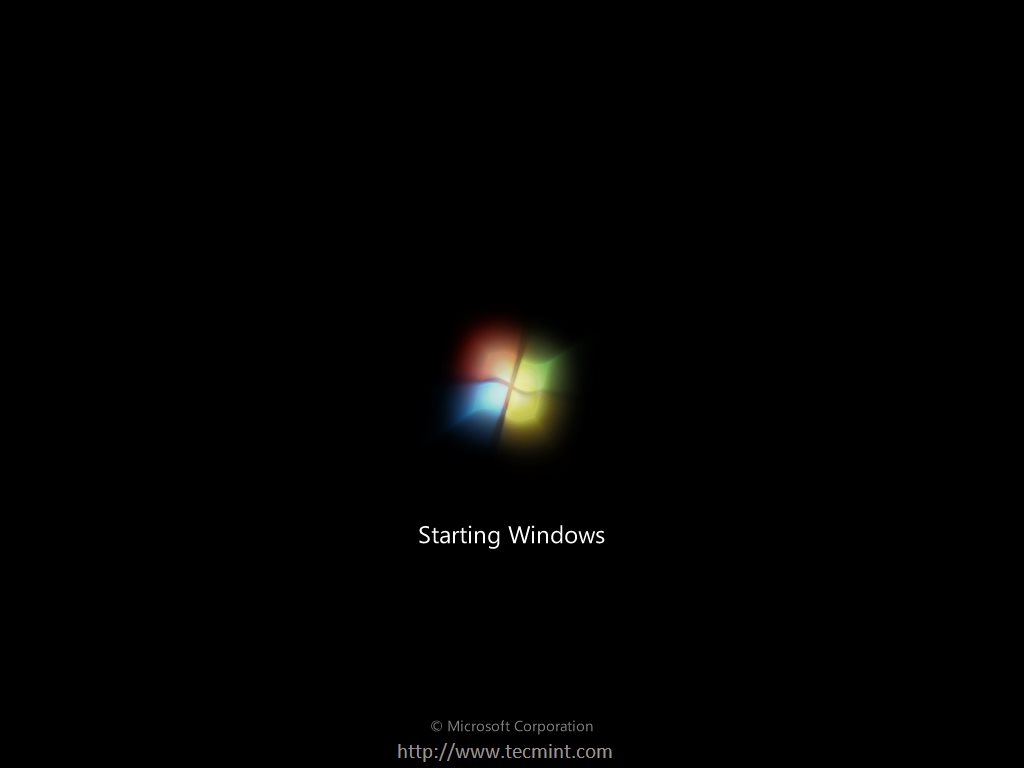
9. After WinPE image finishes loading, a customized minimal image of windows starts and a Command Prompt window will be displayed on screen.
Loading Windows 7 over PXE Boot
Starting Windows 7 over PXE Boot
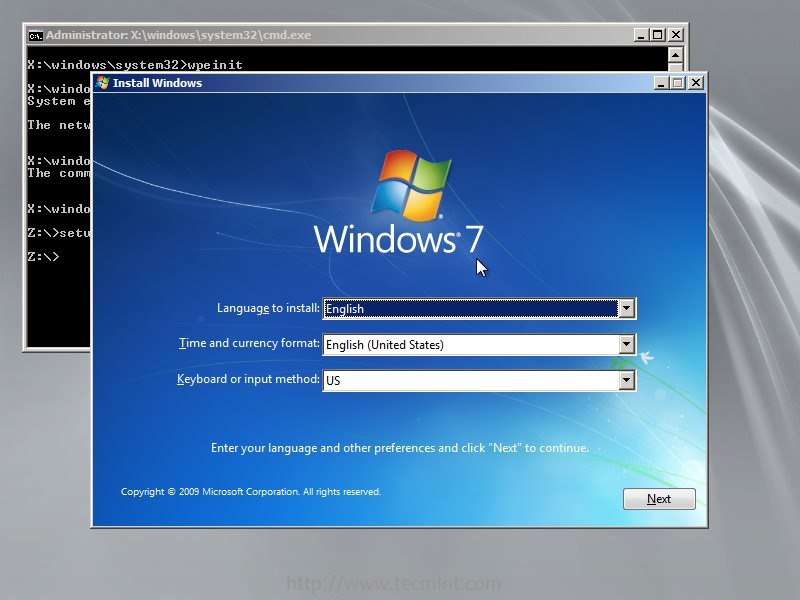
Windows 7 Command Prompt
10. In order to install Windows 7 over a Network Share, in the Command Prompt window, map the Windows installation sources (use the architecture
path you want to install), configured on PXE Samba share directory, as a Network drive.
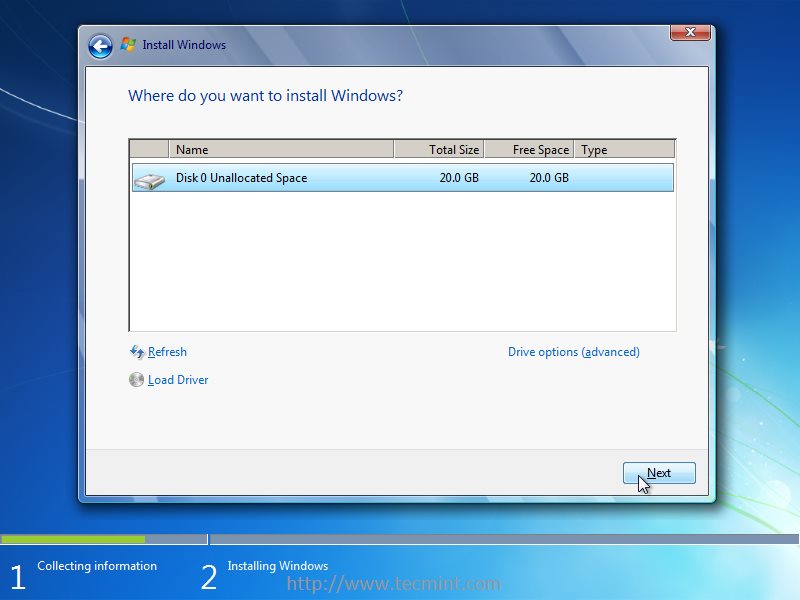
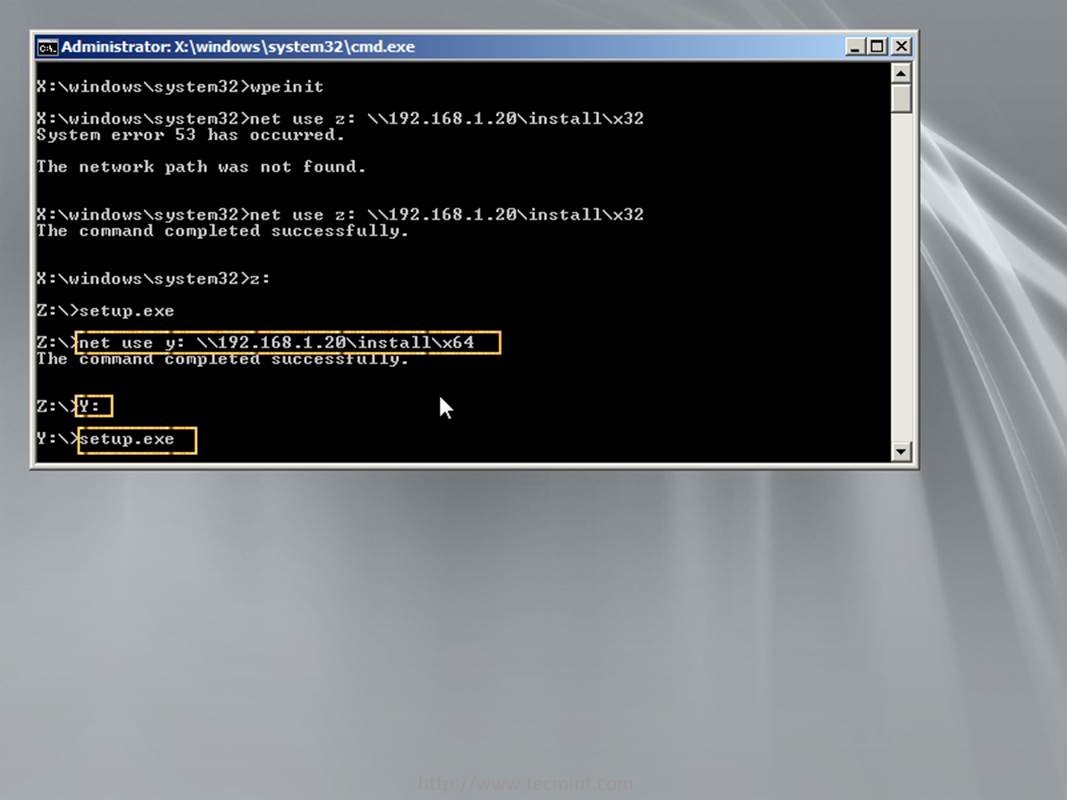
Then enter network drive share, by specifying the drive letter, and run setup.exe utility. Use the following commands to start the installation process (replace the samba network address location and network drive letter accordingly) and continue with the installation process as you normally do it from a local DVD media.
net use z: \\192.168.1.20\install\x32
Z:
setup.exe
Enter Windows 7 Installation Source
Choose Windows 7 Language
Select Drive to Install Windows 7
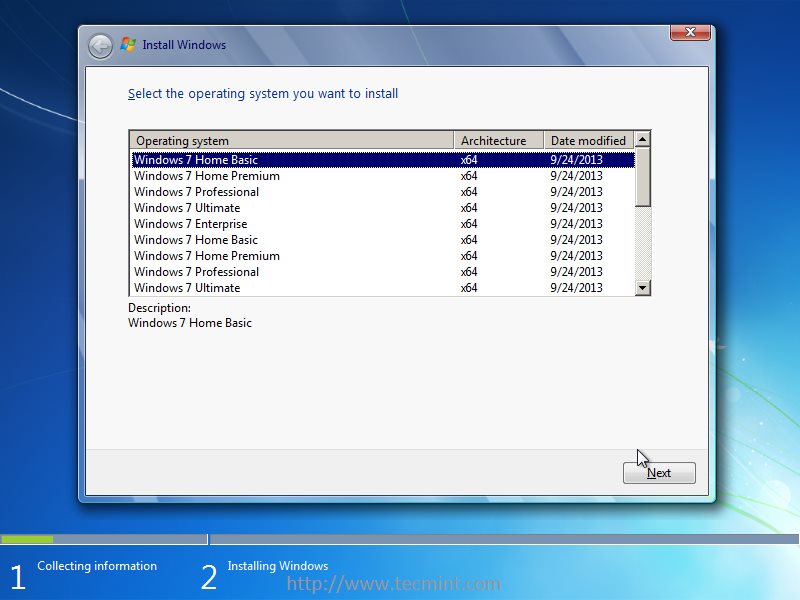
11. If you want to install the 64-bit architecture, map the specific 64-bit network path using a different letter and continue the installation procedure by following the same steps explained above.
net use y : \\192.168.1.20\install\x64
Y:
setup.exe
Choose Windows 7 Install Source
Select Windows 7 Home Basic
12. In case the installation sources are configured with authentication use the following command switch to specify the username.
net use y : \\192.168.1.20\install\x64  /user:samba_username
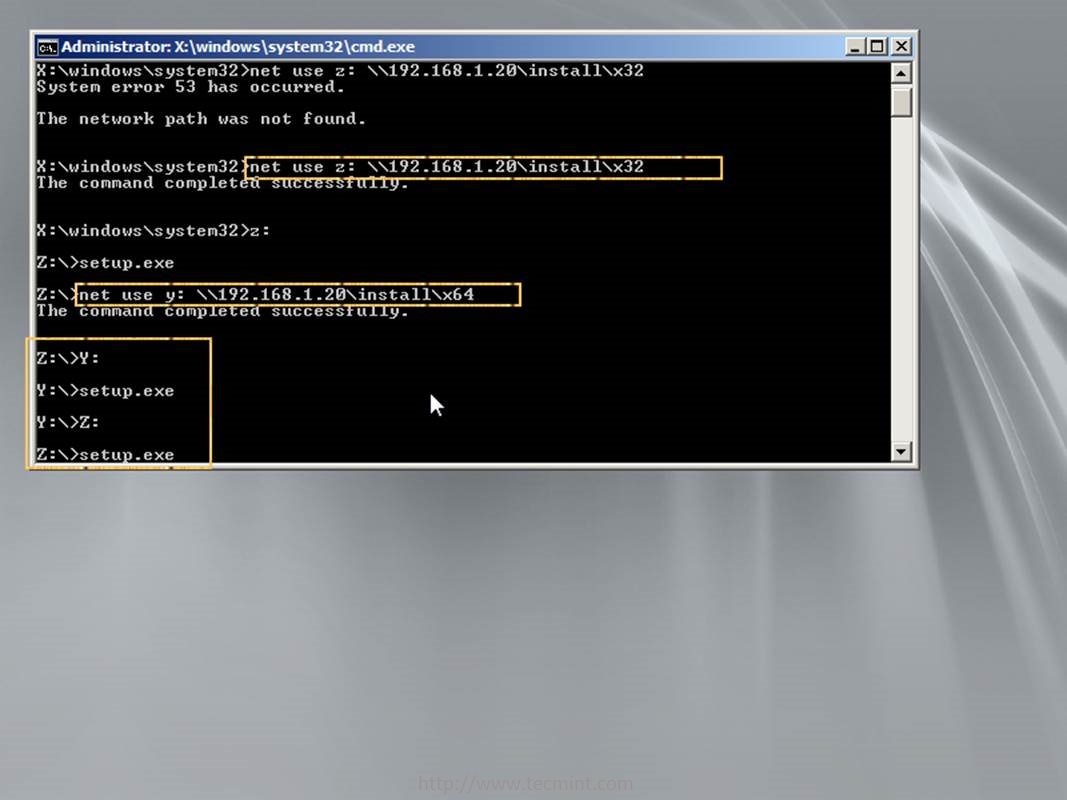
13. After both architectures installation sources had been mapped you can change between them by switching to the designated network drive letter as presented in the screenshot below.
Change Network Installation Source
Thats all! Performing Windows installations over PXE and network has a lot of advantages, such as cutting down the installation time drastically, allowing the installation process to take place the same time on multiple machines without the need to use a physical installation media.
You can also setup multiple Windows Installation Sources (using Windows or Samba shares) on different machines over your network to avoid a bottleneck on RHEL/CentOS PXE Server, in case you install Windows on multiple machines the same time, and direct the network drive maps to use those specific network sources on installation process.


[Windows Deployment: Network Install]: How to Install Any Version of Windows from Other Network Computers

How to Install Any Version of Windows from Other Network Computers

Talk about a complex thing to do: installing Windows over the network. Even installing it via a USB drive is simpler. However, this doesn’t mean it cannot be done. Using a free tool named Serva and a bit of time and attention, anyone can set up his/her network environment so that Windows installations are performed with ease, from one network computer. Here’s how the whole process works!

VERY IMPORTANT Prerequisites

There are many things you need to prepare beforehand, so that everything works smoothly. Please don’t skip any of these elements or the likelihood of failure will be high:
  1. You need to download and extract a little tool named Serva. Download the appropriate version for your operating system (32-bit or 64-bit). You will notice that there are a "Non-Supporter" version and a "Supporter" version. The free one is the "Non-Supporter" version. It includes a small annoyance when you start it, plus a few limitations that won’t impact you unless you are a network admin or IT professional who needs to install lots of operating systems on many network computers. If you are such a professional, go ahead and purchase the "Supporter" version which costs a fair $29.99.
  2. This software is a bit finicky. It doesn’t like long folder structures and installation folders, spaces and special characters. Therefore, extract it in a folder with a short name, directly on the root of one of your computer’s partitions. For example, I extracted it at "D:\SERVA". Choose a similar path on your computer. How to install Windows over the network with Serva
  3. You need the original installation files for the operating system(s) you want to install over the network. Have them at hand as you will need to copy them to a special folder, as they are, without modifications.
  4. For the computers where you are about to install Windows over the network, identify their exact network card model(s). Then, download the appropriate drivers for the Windows version you are about to install on them. By default, Windows setup programs support a limited number of network cards. If your system is rather new, then it is very likely that it won’t support its network card and the installation procedure will fail.
  5. Every time you run Serva, run it as administrator. This way it has the required permissions to create files, save the settings you make, etc.
  6. When you run Serva, make sure that it is not blocked by your firewall. The application must be set as allowed on the computer where it runs, otherwise it won’t be able to transfer anything over the network.
  7. The computer where the installation files are stored and the one where you want to install Windows must be part of the same network. This means that you have a router on your home network, managing network IP addresses and network traffic. If not, then you should directly connect the two computers with a crossover cable.

Step 1 - Run Serva & Make Its Initial Configuration

Run Serva as administrator. The free version will ask you to wait for 7 seconds before you can use it. Once the wait is over, click "Thanks, not today".
How to install Windows over the network with Serva
Its window is now open. Click Settings.
How to install Windows over the network with Serva
First, go to the DHCP tab. If your computers are part of the same network and the management of IP Addresses is taken care of by your router, enable these settings: proxyDHCP and BINL.
How to install Windows over the network with Serva
BINL is a special add-on that acts as a DHCP protocol extension and it is used by Serva during its preparation and maintenance procedures. proxyDHCP is a special setting that tells Serva that it doesn’t need to act as a DCHP server in order to provide IP addresses to the computers connecting to it.
Even though Serva’s developers don’t recommending enabling this setting, we have learned in our testing that it helps eliminate some issues. Therefore, also enable the box which says "Bind DHCP to this address" and leave the default IP address that is provided.
How to install Windows over the network with Serva
There is no need to modify other settings in this tab. Next, go to the TFTP tab.
TFTP comes from Trivial File Transfer Protocol and it is the protocol used by Serva to transfer files over the network. This protocol needs a bit of configuration as well.
First, check the box near TFTP Server. Then, you need to specify the so called "root" directory. This is the directory where you plan to store the Windows installation files. This folder can be the same folder where you extracted Serva or a new one. Keep in mind that you should use short paths and avoid using spaces and special characters (*, &, ", etc) in the directory name or its path.
How to install Windows over the network with Serva
To help eliminate problems in some networking environments, you might want to also check the box near "Bind TFTP to this address" and leave the default IP address unchanged.
How to install Windows over the network with Serva
Press OK to save your settings. Then close Serva and start it again (as administrator). During the restart, it will create a special folder structure in the root folder you specified.
How to install Windows over the network with Serva
Amongst those folders, you must find one named WIA_WDS and another named WIA_RIS. If they are not found inside the root folder you specified, something went wrong with Serva’s configuration. If all is well, go ahead and read the next section in this article.

Step 2 - Copy the Windows Installation Files

Go to the root folder you specified. Here, you need to copy the Windows installation files, as they are, without any modifications from your side.
If you want to install older versions of Windows like Windows XP or Windows 2000, you need to copy those files in the WIA_RIS folder. Since these operating systems are very old and we don’t recommend using them, we won’t provide specific instructions for them.
If you plan to install Windows Vista, Windows 7 or Windows 8, then open the WIA_WDS folder. There, create a new folder named according to the Windows version you want to copy. Use simple folder names, with no spaces or special characters. For example, I used Windows_7.
How to install Windows over the network with Serva
Create separate folders, with different names for all the Windows versions you plan to install over the network, using Serva.
Inside that folder, copy and paste all the installation files for the Windows version you want to install over the network. Simply go to the root of the installation disc, and copy its entire file and folder structure.

Step 3 - Start Serva

Start Serva again, as administrator and wait for it to detect the installation files you added. It will create its special folder structure, required to distribute the installation files over the network.
Then, close Serva and go to the next step.

Step 4 - Copy the Network Card Driver(s)

Next, you need to copy the network card drivers for the computer(s) on which you want to install Windows.
Go the folder where you copied the installation files. In my case it was "D:\serva" (both the root and Serva installation folder), followed by "WIA_WDS\Windows_7".
How to install Windows over the network with Serva
There, go to "$OEM$\$1\Drivers\NIC". If you can’t find these folders, create them yourself.
Then, extract the network card drivers and place them inside. If your drivers come as a setup.exe or as a self-extractable archive, extract it first. Make sure the driver’s ".inf" and ".cat" files are stored directly in the NIC folder.

Step 5 - Share WIA_WDS Folder with the Network

In order for Serva to distribute the Windows installation files over the network, they need to be shared with the network, so that other computers can access them. Unfortunately, Serva requires you to share the WIA_WDS folder (and not its subfolders or other folders) using a very specific share name: WIA_WDS_SHARE. Using any other share name means that the installation procedure is likely to fail.
How to install Windows over the network with Serva
To share this folder with the name we mentioned, you first need to enable advanced sharing in Windows and then share it. Here’s how advanced sharing works in Windows: Share Libraries or Folders Using Advanced Sharing.
You must give the user Everyone read-only permissions. You can also share this folder with specific user accounts, whose login details you will use later on, during the network installation process. Again, read-only permissions are enough.

Step 6 - Start Serva

Start Serva again, using administrator permissions. It will detect the network drivers you added and make a few changes, so that the drivers are distributed correctly when you launch the installation process on other computers. You can now leave it open and waiting for network connections.
Next, go to the computer(s) where you want to install Windows.

Step 7 - On the Target PC - Enable Lan Booting & Boot from the Network

Go to the computer where you want to install Windows and enter its BIOS. Make sure networking booting is enabled. This setting can be named "Boot from the network" or "Boot from PXE".
Then, start the computer and press the required key to bring up the Boot Menu. On most computers, you need to press F12 or F8, depending on the BIOS version. Select Network or PXE (again, this depends on your computer’s BIOS), to boot from the network, using Serva.
How to install Windows over the network with Serva
If all is well, you should see a screen similar to the one below, where the computer’s MAC is displayed and the network card requests an IP address via DHCP.
How to install Windows over the network with Serva
When the computer is connected to the network, Serva loads and displays a screen with the operating systems available for installation. Pick the one you want and press ENTER.
How to install Windows over the network with Serva
The installation files are loaded and a small window named ServaPENet is shown. At this step, Serva installs the network driver you added earlier, loads network resources and connects to the Windows installation folder. Depending on how you shared the WIA_WDS folder, it will ask you to provide a username and password to access it. Type the details of the user account you shared it with and connect.
If all went well, the Windows installation process is now started.

Step 8 - Install Windows Over the Network

Next, continue with the Windows installation, as usual. If you plan to install Windows 8, check this installation guide: How to Install Windows 8 RTM on Your Computer.
If you plan to instal Windows 7, check this article: How to Install Windows 7 - Complete Round of Installation Guides.

Troubleshooting Problems with Serva

If you don’t pay attention to all the steps in this procedure, some things are likely to fail. Here are some things we learned while experimenting with this tool:
  • If ServaPENet returns this error: "Failed No NIC/Driver, Aborting!", it means that you forgot to copy the network card drivers as instructed at Step 4. If you copied them and you still get the error, double check that you have the correct driver for the network card of the computer where you want to install Windows, for the Windows version you are about to install. Also, double check that you copied it to the correct folder. Then, restart Serva to make sure it detects the driver before the network installation procedure starts.
  • If, on the target computer, Serva is not able to load at all over the network, consider enabling the "Bind DHCP to this address" and "Bind TFTP to this address" settings in the DHCP and TFTP tabs.
  • If you connected two computers directly, with a crossover cable, you need to set Serva as DHCP server, in order for everything to work. This means setting the 1st address available in the IP pool, the pool size, and the subnet mask to be used when Serva assigns IP addresses. How to install Windows over the network with Serva
  • One last piece of advice is to check the Serva logs. The messages shown there can help you troubleshoot different problems.
Another good tip is to restart Serva every time you change any of its settings and every time you add something to its root folder.
Since we are not the developers of this software, we cannot provide support for it and help you with all the issues you might encounter. If our guide does not help you, then double check Serva’s documentation - Serva PXE/BINL - AN01: Windows Install and advanced configuration guide - Advanced Topics on TFTP.

Conclusion

As you can see from this guide, setting things up with Serva requires quite a bit of time and attention. However, it is the simplest way of installing any modern version of Windows over the network. It works great both for home networks and small or medium sized business networks.

Friday, April 22, 2016

[Windows/ Linux - DNS]: Hack DNS For Faster Internet Speed

Hack DNS For Faster Internet Speed

n this post i am going to share a method to make a attack on Dns for Faster Internet Speed . By this method you can easily have fast internet browsing and downloading. By this your internet speed can boost up to 20-30%. You just have to follow the simple steps discussed in this post and you can easily hack DNS to have better internet experience.

Also Read: Top Best Password Cracking Techniques Used By Hackers

Hack DNS For Faster Internet Speed

What is DNS?

Now talking firstly about basic of DNS which stands for Domain name server which converts your IP address into your domain address and vice versa. This is actually a protocol . This was designed because it is very difficult for a human being to learn the digits of a IP address and think about remembering the Ip address of all your favorite sites. Thats why DNS is designed which automatically converts your alphabet worlds into their respective IP address.
Also Read: Boost Your Internet Speed By Changing Default DNS to Google DNS

How To Use Alternative DNS Services To Speed Up your Internet ?

Your slow internet speed is not always a fault of your Internet Service provider. It might can be of your default DNS services sets to browse on your internet .So i recommend you to use some alternative DNS instead of Dns provide by your ISP’s, I’ll tell you to use a free public DNS service that will tell your computer to use that service instead of using your ISP prescribed service and will help you to get a faster internet speed on your device.
Also Read: Windows 10 Upgrade Free Download Full Version

How To Speed Up Web Browsing Using DNS Hack

Now to get a faster internet speed, I’ll tell you about free OpenDNS services that are one of the most popular free DNS services that was started to provide an alternative method to those who were discontented with their existing DNS services. Just follow the below steps to do so.
Also Read: How To Create WiFi Hotspot In Windows 10

  1.  Go To Control Panel > Network and Internet options.

  2. Now click on Network and Sharing Center.
    step 2
  3. Click on your internet connection that you have currently connected and open properties of that network.
    step 3
  4. Now click on the Internet Protocol Version 4 (TCP/IPv4) and click on Properties.
    step 4
  5. Now choose the following DNS server addresses to get a faster internet speed
    *Preferred DNS server: 208.67.222.222
    *Alternate DNS server: 208.67.220.220
    step 5
  6. Now click on Ok and now configure Ipv6
    Preferred DNS server: 2620:0:ccc::2
    Alternate DNS server: 2620:0:ccd::2
    step 6
  7. Save all the settings and now you are using a DNS with fast internet browsing.
Thats  it you are one by this your internet speed will get boost and you can enjoy fast browsing.
Also Read: Top Best Hacking Tools Free Download
So above is the method for Hack DNS For Faster Internet Speed. By following the simple steps discussed above you can easily boost up your internet speed and can have better browsing experience also by this you can search safely on your private internet. Must try both the methods and have fun over the internet. Don’t forget to share this cool post. Leave a comment below if you face any problem at any step.


Sunday, March 13, 2016

[Windows]: Live Telecasting on Your Web

Live Telecasting on Your Web 

Presented here is an Internet-based project for telecasting live video from your computer to your webpage. The video can be viewed on the computers of your family members, relatives or friends living in different parts of the world.

This is also an interesting project for people who have basic knowledge of computer hardware, software, operating system, networking, Internet technology and webpage written in hypertext markup language (HTML). For more information, you may refer to ‘Make Your Own Web Server’ project published in January 2013 issue.

Tools required for the project:
1. A TV tuner card with audio and video inputs
2. A camera with audio and video outputs
3. A microphone
4. A broadband Internet modem
5. A high-speed broadband Internet connection
6. A video streaming software

Hardware and software installation
It is assumed that your PC has Windows operating system with Internet connection and is ready for the following hardware and software installations and testing:
1. Installation of a TV tuner card on the PCI slot for audio and video capturing
2. Installation of TV tuner card drivers
3. Testing of video camera picture and sound system
4. Installation of a video streaming server software
5. Creating an HTML page for live web telecasting
6. Uploading the created HTML page to your website
7. Watching live programme on your Web server

1. Installation of a TV tuner card for audio and video capturing. This is the most important part of the project. Here we used an inexpensive and easily available PixelView PCI TV tuner card for capturing picture and sound for telecasting.
It has video and audio input sockets provided on its back side for connecting to any type of camera with video and audio outputs.

Fig. 1: PixelView TV tuner card with video and audio inputs

Fig. 2: PCI slots in your computer

Fig. 3: Pinnacle 110i TV tuner Card

Fig. 4: Connection of Sony Handycam with a TV tuner card
First switch off the power supply of your PC and open the cover of the CPU unit. Insert the PixelView PCI TV tuner card (refer Fig. 1) into the spare (available) PCI slot. Use a bolt to fix the card on the frame to ensure that it is properly fixed in the PCI slot (refer Fig. 2).

Now, close the PC cover and power on your PC for TV tuner card driver installation. (Note. You can also use any other compatible TV tuner card, such as Pinnacle110i, as shown in Fig. 3. Other types of USB TV tuner cards with audio and video inputs can also be used for the purpose.)
Here we are using Sony Handycam (refer Fig. 4). A 50m long CCTV system AV cable can be used between camera and PC for longer distance coverage. (Webcam is not used due to cable length limitation and non-availability of AV outputs.)

Fig. 5: Installation of PixelView PCI TV tuner card driver for Conexant BT878

Fig. 6: Testing sound and picture of Sony Handycam for telecasting

Fig. 7: BroadCam video streaming server

2. Installation of TV tuner card drivers.
Insert the TV tuner card driver CD in the CD drive of your PC and click on the Install option. It will start installing the driver on your PC. Follow the on-screen instructions as shown in Fig. 5.


If you are using Pinnacle 110i TV tuner, you can download the driver from the link mentioned below:

http://drivers.softpedia.com/dyn-postdownload.php?p=14328&t=4&i=1

3. Testing of video camera picture and sound system. After driver installation, launch PixelView from your desktop. The screenshot of the program output is as shown in Fig. 6. Select TV option from PixelView control panel, configure the video as PAL system and country as India. Now connect an antenna or a cable TV to the card to watch TV programme on your PC. If your TV programme is working well, it is time to test the camera.
Test the picture and sound of your camera with the TV tuner card by connecting camera audio and video outputs to audio and video inputs of the TV tuner card. You can use a self-made 50m long CCTV cable with male and female connectors on both ends of the cable for audio and video connections (refer Fig. 8).

Fig. 8: Self-made audio-video cable with both end male and female connectors

Fig. 9: Live telecasting on Web server

Download Source Code: Click Here

Select Composite option from PixelView’s control panel and switch on the Sony Handycam. You will get a picture on your PC monitor screen and sound on your speakers.


You can also connect another similar device with audio and video output to TV tuner card for watching on your PC or for telecasting. You can connect a DVD player or a set-top box for watching movies or TV programmes or telecast the selected TV programme on Internet through your webpage.

(Note. For Pinnacle110i TV tuner card, you can also use VLC media player for testing sound and picture of Sony Handycam for telecasting.)
4. Installation of video streaming server. There are a number of software available on the Internet for video streaming, but here we have used BroadCam video streaming server software because of its simplicity, easy availability and quick installation. This software is available in both free and paid versions. For software configurations, tutorial and other help, visit the link: http://www.nchsoftware.com/broadcam/tutorial.html
You can download this software from the link: http://www.nchsoftware.com/broadcam/ and install it by double clicking on bcsetup.exe file, and follow the on-screen instructions. After proper installation, you will find an icon on your computer desktop with the title ‘BroadCam Video Streaming Server.’ Click on this icon to run the program on your PC and you will get a screen as shown in Fig. 7.

Click on the Start Server button (it has start and stop functions) to start video for live telecasting.

Click on BroadCam Video Streaming Server Live to check live input settings.
Click on Open Links option to get live streaming link and web HTML code.
5. Creating an HTML page for live web telecasting. From BroadCam video streaming server program, select Tools/Options/Web Access options and click on the link given below corresponding to Local Network option:

http://192.168.1.99:86/live.html?src=1

You will get a video streaming screen and HTML code for inserting on your webpage. Select HTML code, then copy and paste it on your webpage.
You can create your own webpage and paste a video streaming HTML code on it by using any HTML editor such as Microsoft FrontPage.
The HTML code for creating your webpage for live telecasting is provided in this month’s EFY DVD and at source.efymag.com. You can copy this HTML code and paste it on Notepad editor and save the file name as index.html

6. Uploading an HTML page on your webpage. You can upload index.html file created above by following the details as described in ‘Make Your Own Web Server’ article in EFY January 2013 issue, or you can use FTP for uploading index.html to your web as explained below:
1. Click on Start-> Run button on your desktop
2. Type your ftp IP address such as ftp://210.150.160.38
3. Enter your user name and password
4. Copy index.html file into your web wwwroot folder. (This is the root directory of your site.)

7. Watching your live programme on your Web server. Now, open Internet browser and type your web address as:
http://www.yourwebname.com

You will see your webpage as shown in Fig. 9

You can see the live video from here. 

Tuesday, March 8, 2016

[Windows]: Change Windows Product Key After Install

Change Windows Product Key After Install


Do you need to change your product key so you can activate Windows Vista, Windows 7, Windows 8 or Windows 10? There are two methods that will help you easily change the product key and activate.
Method 1: Command Line Utility
You can use a great command line tool that will help you do this very quickly. Just follow these steps:
Launch the Start Menu and type in command prompt or cmd so that it shows up on your start menu search list. Right click on the Command Prompt shortcut and select Run As Administrator.
At the administrator command prompt, type in "slmgr.vbs -ipk "
slmgr.vbs -ipk 00000-00000-00000-00000-00000
To activate windows after changing the key, run "slmgr.vbs -ato"
Method 2: Using the Activation UI
Alternatively, if you want to use a graphical interface, run the following at a command prompt as suggested by Dave in the comments. 
slui.exe 3
Then just type in your product key and click the Activate button.