Showing posts with label Office. Show all posts

Friday, February 13, 2015

[Windows] : How to Import / Export Contacts Between Outlook and Gmail

How to Import / Export Contacts Between Outlook and Gmail


You can use Microsoft Outlook with just about any e-mail account. If you use something like Gmail or Yahoo! Mail, you’ve probably amassed quite a few contacts, which will need to be imported into Outlook to make it immediately useful.
Similarly, if you use Outlook already for e-mail and you have been managing your contacts with it, then you will be missing out on your changes if you use your e-mail’s native interface, typically in a browser window.
You can enter each contact one by one, but we recommend importing your contacts in one go, whether that is to or from another e-mail client like Thunderbird, or a web-based e-mail account like Gmail or Yahoo! Mail. In this article, we’ll demonstrate how to first export your contacts from Gmail into Outlook, and then export from Outlook into Gmail.

Importing Contacts from Gmail into Outlook

To begin, first click on “Mail -> Contacts” in your Gmail inbox.
sshot-1
Next, click the “More” button and choose “Export…” from the dropdown selections.
Contact_Manager_-_matthewklein_howtogeek_com_-_How-To_Geek_Mail_and_Document1_and_Microsoft_Word.png
Notice, you can export a group, selected contacts, or all your contacts into one of three formats. The export format should be an Outlook .CSV (CSV = Comma Separated Values, which means each field [Name, Address, Phone, etc.] is separated by a comma) file.
sshot-19
Note, you can open this exported .CSV file in Excel and manipulate it you like, such as adding addresses, phone numbers, e-mail addresses, and other information that will help round out your address book.
sshot-21
While this is an optional step, it’s nice to be able to go through and make your contacts neat and consistent.
When you’re ready, it’s time to import your shiny new contacts file into Outlook. Click on “File” and then “Import/Export.”
sshot-6
On the Open screen, click “Import/Export” and you’ll be shown a wizard dialog. You want to choose “Import from another program or file” and click “Next.”
sshot-23
Now, choose “Comma Separated Values” and click “Next.”
sshot-24
You’ll then be asked to browse for the file you want to import. Under options, you can decide whether or not you want duplicates to be imported.
We select “do not import duplicate items,” and click “Next.”
sshot-25
The following screen will ask you to select a destination folder, which should be your Outlook contacts.
sshot-26
Go ahead and click “Finish” on the last screen and your contacts will be imported into Outlook. You can see your results by opening the People mode.
sshot-29
Now, you can go through and edit to your heart’s content such as adding images, mailing addresses, secondary phone numbers, and any other bits of information you think are important and relevant.

Exporting Contacts from Outlook into Gmail

If you want to copy your Outlook contacts over to your Gmail account, it is similar to the preceding process.
In Outlook, click on “File -> Import/Export.”
sshot-6
When the import/export wizard opens, select “export to a file” and then click “Next.”
sshot-219
On the proceeding screen, we want to select “Comma Separated Values” and click “Next.”  This is going to give us a .CSV file just like when we exported our contacts in the last section.
sshot-1
Choose your contacts on the next screen. You might have to scroll through to find them, but they should be under your main e-mail account.
sshot-2
This last screen shows you what’s about to happen (“Export ‘Contacts’ from folder: Contacts”) and offers you the opportunity to map any custom fields you might have created in Outlook.
sshot-5
What does this mean? Simply, some of the fields in your Outlook address book might not match the destination you’re importing to, which means you’ll need to “map” them. As the dialog explains, you need to drag the Outlook value right, to the field that most closely resembles it.
sshot-4
Chances are you probably won’t need to mess with this, but it’s good to know in case you import your Outlook contacts and end up with mismatched fields. Regardless, when you’re ready to make the conversion, click “Finish” on the previous screen.
Now that you’ve got your .CSV file with all your contacts in it, it’s time to import into Gmail. Again, if you want open this up in Excel and do some quick editing, this is your chance.
sshot-21
When you’re ready, in Gmail, click on the “Mail” dropdown menu and select “Contacts.”
sshot-1
On the contacts screen, click the “More” button and select “Import…” from the selections.
sshot-2
Click “Choose File” on the import contact screen.
sshot-3
The open dialog appears; you know the drill, choose your .CSV file in its save location and click “Open.”  When you’re back at the import contacts screen, click “Import.”
sshot-4
Your newly imported contacts won’t be merged into your main contacts – at least not in Gmail – instead they’ll get their own group.
sshot-5
If you click on your imported contacts, you’ll be able to merge them and delete duplicates. It might take a little time to clean them all up but if things are a total mess, then you can always remove your imported contacts, return to Outlook, and perform the process again, this time either using the map fields function or Excel to fix the problems.
Regardless, you now have an address book full of contacts that you can immediately start e-mailing. That said, this is a one-time deal, meaning that when you start making changes to one e-mail client or service, the other won’t reflect them. If this is an ongoing issue, and you use Gmail, you might consider something like GO Contact Sync Mod, which we’ll explain in an upcoming article.

Tuesday, February 10, 2015

[Office]: Ultimate Setup Guide for Gmail with Outlook 2010

Ultimate Setup Guide for Gmail with Outlook 2010


Up until a few days ago, I was using my MacBook Pro with the Mail app to manage all my email accounts. Unfortunately, my Mac hard drive crashed and I was left with nothing but a Windows 7 PC I had just setup a few days earlier.
Since I like using a desktop app, I ended up using Outlook 2010 for my email rather than Thunderbird or other choices. Outlook is familiar and I just like it’s interface more.
However, configuring Outlook 2010 with Gmail for optimal settings is not that straight-forward. It took me a while to figure out how to get everything setup properly so that my labels showed up as folders, sent emails showed up in Gmail Sent folder, Google Calendar synced with Outlook calendar, etc.
The only thing you can’t get to work is the Drafts folder. For whatever reason, there is no way to map the Outlook 2010 drafts folder to the Gmail IMAP Drafts folder. Minor annoyance, but just so you know.
Otherwise, you can get everything else working just fine. In this article, I’ll walk you through the steps to properly configure Gmail with Outlook 2010.
To get started, open Outlook 2010 and click on File and then Add Account.
image
Go ahead and choose E-Mail Account and then type in your name, email address and Gmail password. Note that if you are using Google with 2-factor authentication, you’ll need to use an application-specific password instead of your normal Gmail password.
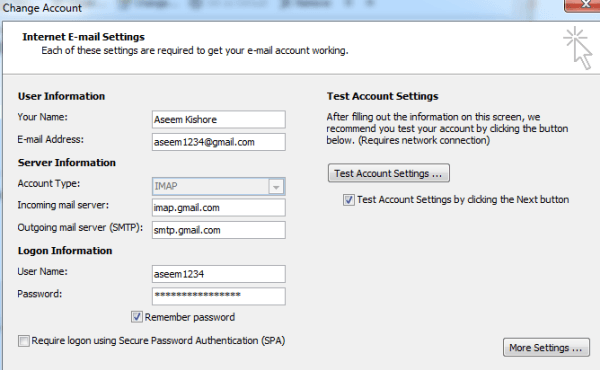
Now Outlook should be able to detect all the proper settings for you and configure Gmail with the correct incoming and outgoing settings. You should get a Microsoft Outlook test message in your Gmail account once it has finished. If, for any reason, you have to manually enter the settings for the server, here is what it should look like:
image
Then click on More Settings to configure the rest of the settings. Click on Sent Items first and make sure you choose Do not save copies of Sent Items. If you try to save them to the Sent IMAP folder on the server, every time you send a message, you’ll see a duplicate in the Sent mail folder. Anything sent through IMAP automatically gets put into the Sent mail folder on the server, so you don’t have to save copies of sent items.
image
Next click on Deleted Items. Here is where things get a little tricky.
SNAGHTML54814b3
So there are a couple of things you can do for deleted items. The first option “Move deleted items to the following folder on the server” can be set to the Gmail Trash folder as seen above.
However, this is different than the way Gmail deletes emails. For example, if you go to the web interface and delete an email in Gmail, it will simply remove all the labels, including Inbox, and will move the email to the All Mail folder. This is kind of a catch all folder. So in theory, nothing actually ever gets deleted from your Gmail account.
If you choose the setting mentioned above, the email will go to the Trash, meaning it won’t show up in the All Mail folder either. Basically, it’s really gone. So make sure that’s what you really want to do.
Secondly, ONLY choose the Trash folder when choosing this option. Do not try to move deleted items to the All Mail folder or any other label. Just move it to Trash or you’ll see some funky behavior.
If you want the normal behavior of Gmail, you need to select Mark items for deletion but do not move them automatically. Make sure you check Purge items when switching folders while online.
Then you need to go to Gmail, Settings and click on Forwarding and POP/IMAP. If you leave the IMAP access settings as is, then when you delete a message in Outlook and then do a purge, it will auto-expunge (remove the label) and move the item to the All Mail folder.
image
You can also turn that off and then choose what you want to do when you do a purge in Outlook. You can archive (which is the default) or move it to the Trash or delete it forever. I suggest leaving Auto-Expunge on and having the message archived. If you really want items deleted, then choose to move deleted items to the Trash Gmail folder like shown above.
Next click on Advanced tab and these settings should be set already. Incoming server uses port 993 and SSL and outgoing server uses port 587 and TLS.
image
The one thing you’ll want to add is [Gmail] as the root folder path. This basically removes the extra folders and makes Gmail work more seamlessly with Outlook. The only thing is that all your labels will disappear when you do this! Whoops. Not to worry.
All you have to do is go to Settings in Gmail, click on Labels and create a new label called [Gmail]/Labels. You can choose anything for the word “labels”. Then, you have to move all the labels you want to see in Outlook under [Gmail]/Label. You basically have to nest those labels under the newly created label.
image
Now your Outlook should look something like this:
image
Pretty sweet! Now people have complained that there are times when they don’t see an updated new message count under some of their Gmail labels. The way to fix this is by scheduling a Send and Receive All every so often. You can do this by going to the Send /Receive tab and then clicking on Send/Receive Groups and clicking on Define Send/Receive Groups.
image
Make sure that the group name All Accounts has the check box Schedule and automatic send/receive every x minutes enabled. Note that your labels will not have their new message counts updated the second you get a new email under those labels. For whatever reason, a Send/Receive has to be done and then the counts get updated. Also, click on Edit and make sure your settings match:
SNAGHTML58f5379
You want to make sure that Get folder unread count for subscribed folders is checked. It would be nice if the counts were updated immediately, but they don’t. However, you can do a Send/Receive more often if you need the count updated quickly.
Now in order to get your Google Calendar synced with your Outlook calendar, just download Google Calendar Sync.
Install it, type in your Google account info and choose how you want to sync:
image
I would recommend 2-way since it allows you to add events to either Outlook or Google Calendar and they will sync automatically. After the sync is finished, you’ll see events appear in your Outlook calendar:
image
Now for the final part, which is the most fun! Basically, starting fresh in Outlook, you will have nothing in your auto-complete list. When you go to type an email address, you’ll get no auto-complete suggestions. This kind of sucks. So how can you import your Gmail contacts into Outlook and have them show up in the auto-complete list?
Here’s how. First, you need to go to Google Contacts and export your contacts.
image
Choose Outlook CSV format and choose which contacts you want to export. You can either export all (which may be a ton) or you can choose from a group. You can also create a group, add the emails to that group and then export. That way you won’t have a ton of useless contacts in Outlook after the import.
Next, go to Outlook and click on FileOpen and then Import.
image
Choose Import from another program or file and click Next.
image
Then choose Comma Separated Values (Windows) and click Next.
image
Go ahead and browse to the location of the CSV file and choose Do not import duplicate items.
image
Choose Contacts for the destination and click Next.
image
Click Finish and everything will be imported. Now that is step one. You’ll notice all your contacts are in the address book, but when you go to type an email, it still won’t auto-complete anything. That’s where you have to download a third-party tool called NK2View. Don’t worry about how it works, just follow the instructions below. First, shut down Outlook.
Then, scroll down to the bottom of the web page and download NK2View. Then unzip it and run the EXE file. It will look something like this:
image
Basically, whatever shows up in that list is what is currently saved in the auto-complete list. This tool lets you import anything you want! So now you can simply import the entire address book, which we just populated with all the Gmail contacts. So click on File and then click on Add Items From Address Book.
image
Go ahead and press SHIFT + click to select all the items. Then click the To-> button at the bottom. Then click OK.
SNAGHTML5a403b5
That’s it! Now exit the program and open Outlook. Go to type an email and voila! Your auto-complete list will have all the emails from Gmail:
image
Now you can enjoy Outlook 2010 nicely connected and working with your Gmail account! Hopefully, this intensive guide helps someone out there! Feel free to post a comment if you have opinions, comments, questions, etc. Enjoy!

[Office]: Create HTML Email Signatures for Hotmail, Gmail, Yahoo Mail

Create HTML Email Signatures for Hotmail, Gmail, Yahoo Mail


Most people know how to create emailsignatures for programs like Microsoft Outlook because it’s easy, however, creating professional HTML email signatures for online email services such as Gmail, Hotmail, and Yahoo Mail is a real pain.
I had written earlier about a Greasemonkey script called Insert HTML Signature, which works for only Gmail. An HTML signature is much better than a normal plain text signature because you can add lots of formatting to make your signature much more professional looking.
If you use Firefox, you can either install Greasemonkey and use the script I mentioned above or you can check out a cool Firefox add-on called WiseStamp that not only works with Gmail, but also with other email service providers, such as Hotmail, Yahoo Mail, AOL Mail, or any other webmail service! Now that’s definitely much nicer.
wisestamp
WiseStamp has a lot of cool features that make it the best add-on I’ve come across so far for creating and adding email signatures. Here’s a quick overview of the program:
  • Personally design email signatures
  • Easy to use GUI interface for creating signatures
create html email signatures
  • Rich Text WYSIWYG editor
  • Ability to add a logo or graphic to your signature
  • Supports all web email services and all webmail functions such as Compose, Reply, and Forward
  • Include your IM icons and ID’s into your signature easily
  • Add links to all your social networking services like LinkedIn, Facebook, Twitter, etc
  • Supports special characters
  • Supports LTR and RTL languages also
create email signature
The other cool thing about WiseStamp is that it has a whole bunch of email signature templates that you can download and just replace with your information! It’s great because they have created some very professional looking signature templates, so you can start including great looking signatures in a few minutes!
Overall, the add-on is one of the best for generating email signatures. I wish it worked in Internet Explorer also, but as of right now it does not. Enjoy! Source: DownloadSquad