Alternative Method to Hide Files and Folders in Windows
It seems like people just can’t get enough of the how-to guides on creating hidden folders or locked folders in Windows. I’ve already written two guides on how to hide a folder, one by using a very simple built-in feature of Windows and another by using some Windows scripts. In the latter article, I also mentioned a free program that you can use called Folder Hide to completely remove a folder from visibility. Lastly, I’ve written about hiding an entire drive letter in Windows too.
But there’s yet ANOTHER way you can hide a files and folders, which is similar to the first post I mentioned above, but is a little bit more secure. It actually involves using the command prompt and a built-in Windows function to change certain attributes of a file or folder. Once the attributes have been changed, the files cannot be seen by the system.
The reason I like this method is because it does not involve any third-party software, which people may notice, and it’s not as simplistic as the first method I wrote about where you simply change the properties of the file or folder to hidden and anyone can easily un-hide the folder by configuring the Windows Explorer setting to “Show Hidden Files and Folders”.
Here’s how you can create a hidden folder in Windows for free that is fairly secure:
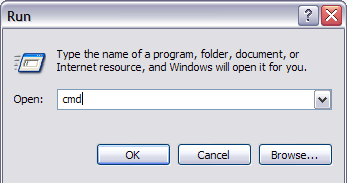
1. Go to Start, Run and then type in CMD to open the command prompt window
2. Now navigate to the parent folder of the folder you want to hide. If you want to hide a file, navigate to the folder where the file is located. For example, I want to hide a file in C:\Test, so I would type in the following:
CD C:\Test
3. Now type in the following command, replacing the word filename with the name of the file you want to hide.
attrib filename +s +h
And that’s it! Your file or folder is now completely hidden! It won’t show up in My Computer, it won’t show up if you browse via the command prompt and it won’t even show up if you select “Show all Hidden Files and Folders“.
If you want to un-hide the folder, you simply follow the same steps, expect now you’ll run this command:
attrib filename -s -h
You can use this command for both files and for folders. In our example, if I wanted to hide C:\Test, I would go one level above to C:\ and then type in:
attrib Test +s +h.
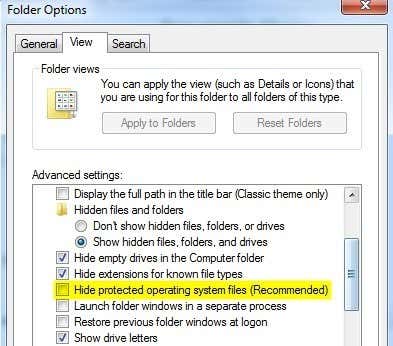
So you’ll notice that I had said this procedure is “fairly secure” above and the reason for that is you can still un-hide the hidden files or folders in a very simple way. When we change the attributes of the file/folder in the above method, we are actually just making it a hidden protected system file. In order to show protected system files, all you have to do is go to Folder Options, View tab and uncheck the Hide protected operating system files box.
Now if you were to browse into that directory with the hidden file or folder, you would see it listed there with a greyed out icon. As mentioned previously, all of these are very simplistic ways to hide data in Windows, but they can come in handy for short-term situations or for hiding content from kids, etc. It’s also rare for people to un-hide system protected files whereas a lot of people do enable the Show Hidden Files and Foldersoption in Windows.
So now you have four different ways to hide a file, folder or drive in Windows! If you have any questions, post a comment. Enjoy!


No comments:
Post a Comment